


17
GB
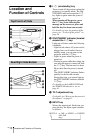
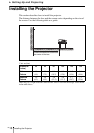
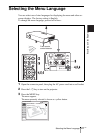
Connecting the Projector
Setting Up and Projecting
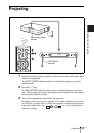
Connecting the Projector
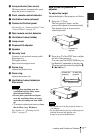
When you connect the projector, make sure to:
• Turn off all equipment before making any connections.
• Use the proper cables for each connection.
• Insert the cable plugs firmly; loose connections may increase noise and
reduce performance of picture signals. When pulling out a cable, be sure to
pull it out from the plug, not the cable itself
To connect the projector, refer to the illustrations on the next and the
following pages.
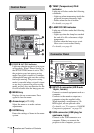
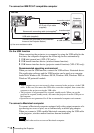
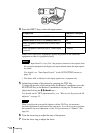
This section describes how to connect the projector to a computer.
For more information, refer to the computer’s instruction manual.
• The projector accepts VGA, SVGA, XGA, SXGA (VPL-CX5 only) and SXGA+
(VPL-CX5 only) signals. However, we recommend that you set the output mode of
your computer to XGA mode (VPL-CX5) or SVGA mode (VPL-CS5) for the external
monitor.
• If you set your computer, such as a notebook type, to output the signal to both your
computer’s display and the external monitor, the picture of the external monitor may
not appear properly. Set your computer to output the signal to only the external
monitor.
For details, refer to the computer’s operating instructions supplied with your
computer.
• This projector is compatible with a DDC2B (Digital Data Channel 2B). If your
computer is compatible with a DDC, turn the projector on according to the following
procedures.
1 Connect the projector to the computer by using the supplied HD D-sub 15 pin cable.
2 Turn the projector on.
3 Start the computer.
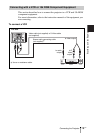
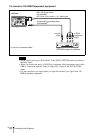
Connecting with a Computer
Notes