


Handbook for SXV-M5C Issue 1 August 2004
13
value’ (the value of the brightest pixel) will also be shown in the adjacent text box and
this can be used as an indication of the focus accuracy. Although the peak value is
sensitive to vibration and seeing, it tends towards a maximum as the focus is
optimised. Carefully adjust the focus control on your telescope until the image is as
sharp as possible and the peak value reaches a maximum. Wait for any vibration to
die down before accepting the reading as reliable and watch out for bursts of bad
seeing, which reduce the apparent focus quality. Quite often, the peak value will
increase to the point where it is ‘off scale’ at 4095 and in this case you must halt the
focus sequence and select a shorter exposure if you wish to use the peak value as an
indicator. Once you are happy with the focus quality achieved, you might like to trim
the settings of your par-focal or flip mirror eyepiece to match the current camera
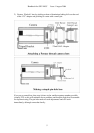
position. Although you can reach a good focus by the above method, many observers
prefer to use additional aids, such as Hartmann masks (an objective cover with two or
three spaced holes) or diffraction bars (narrow parallel rods across the telescope
aperture). These make the point of precise focus easier to determine by creating
‘double images’ or bright diffraction spikes around stars, which merge at the setting
of exact focus. The 12-16 bit slider control allows you to adjust the contrast of the
focus frame for best visibility of the star image. It defaults to maximum stretch (12
bits), which is generally ideal for stars, but a lower stretch value is better for focusing
on planets.
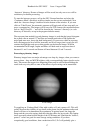
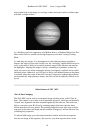
Taking your first astronomical image:
I will assume that you are now set up with a focused camera attached to a telescope
with an operating sidereal drive. If so, you are now in a position to take a moderately
long exposure of some interesting deep-sky astronomical object (I will deal with
planets later!). As most drives are not very accurate beyond a minute or two of
exposure time, I suggest that you find a fairly bright object to image, such as M42,
M13, M27 or M57. There are many others to choose from, but these are good
examples.
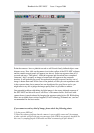
Use the finder to align on your chosen object and then centre accurately by using the
focus frame and a short exposure of between 1 and 5 seconds. The ’12-16 bit’ slider
in the focus frame allows you to adjust the image contrast if you find that the object is
too faint with a short exposure. Once properly centred and focused, take an exposure
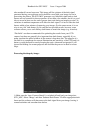
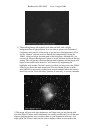
of about 60 seconds, using the ‘Fast’ mode and observe the result. Initially, the image
may appear rather barren and show only a few stars, however, there is a great deal of
data hidden from view. You can get to see a lot of this, without affecting the image
data, if you go to the ‘View’ menu and select ‘Auto Contrast Stretch Image’. The faint
image data will then appear in considerable detail and I think that you will be
impressed by the result!
If you are happy with the image, go to the ‘File’ menu and save it in a convenient
directory.
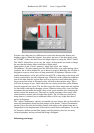
Now you need a ‘dark frame’, if the best results are to be extracted from your raw
image. To take this, just cover the telescope objective with the lens cap, or drop the
flip mirror to block the light path to the CCD (make sure that this is light tight), and