


Handbook for SXV-M5C Issue 1 August 2004
24
displayed image, but, if not, try increasing the exposure time a little. Remember that
the ideal guide star is one that is bright enough to be easily detected in a 1 second
exposure, or less.
Once you have the test image and can see an appropriate guide star, go to the ‘File’
menu and click on ‘Select guide star’. Now click the mouse on the image, with the
pointer on your selected star. The pointer will jump onto the star and a message box
will show its co-ordinates in a message window – press ‘OK’ to confirm the selection.
You have now selected the guide object and are ready to start an exposure.
Call up the camera control panel and select a 1 second (or the length necessary for
your guide star) exposure time. Click on the check box ‘Self guide next exposure’ and
‘1 second’ should appear in the self guide exposure box. Now set the exposure for the
image (try 5 minutes as a good starting point) and click on ‘Take picture’.
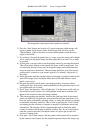
The control panel will disappear and be replaced by the guider window, with a set of
number boxes above it. The guider software will now attempt to centre an 80 x 40
pixel box around the guide star and this will appear in the guider window after a few
seconds delay. The number boxes will also begin to show the star co-ordinates and the
differential guiding error as each new guide field is displayed.
If all is well, the error numbers will remain at generally less than 1 pixel and the star
image will sit steadily at the same location in the guide box. If, however, the star
begins to drift away, it is possible that your drive guide directions are reversed in
either RA or DEC (or both). Press ‘ESC’ to stop the exposure and go back to the ‘Set
Program Defaults’ menu, where you can use the ‘Swap n/s direction’ and ‘Swap e/w
direction’ check boxes to reverse the appropriate drive. Another problem, which can
arise, is that the star may remain close to the correct position, but will oscillate around
it by two or three pixels, rather than holding nearly steady. This can be due to several
different faults, such as poor drive accuracy, windy conditions, or bad seeing, but may
also be caused by an excessive ‘Loop gain’ in the self-guider feedback loop. Try
increasing the ‘Pixels per second’ values in the appropriate default setting box, until
stable following is achieved. Once the guider is set up correctly, it should hold a guide
star within 1 pixel of its correct position indefinitely, and you can try taking test
exposures of various objects to confirm its accuracy.
After your first test of the self guider, there is a good chance that the set-up will still
need some optimising. You have the option of manually setting test values of
backlash and hysteresis, or using the ‘Training’ routine in the software. Backlash is
the time delay between a reversal of a drive motor and the start of a positional
correction of the telescope. Hysteresis is the time it takes for a motor to stop, after the
power is removed. Many mounts have internal software to compensate for these
errors, but you may need to set values other than zero to get the best performance
from less sophisticated ones.
The ‘Training’ option can be used as follows:
Select a star to guide on, and then the drive training period, using the ‘radio buttons’.
The best training time will vary with the response speed of the mount, but use as long
a time as possible, consistent with not losing the guide star out of the guide window.
Start the training cycle and the software will then sequentially drive the telescope in
all four directions, while recording the displacement of the reference star. After the