


Handbook for SXV-M5C Issue 1 August 2004
7
seconds. Restart the camera software and see if it can link now. If not, check in
Windows device manager (via ‘System’ in ‘Control Panel’) and see if the BlockIO
device is installed properly.
3) If you cannot find any way of making the camera work, please try using it with
another computer. This will confirm that the camera is OK, or otherwise, and you can
then decide how to proceed. Also check on our web site to see if there are any updates
or information about your camera software that might help. The message board might
prove useful to ask for help with getting your camera operating properly.
Our guarantee ensures that any electrical faults are corrected quickly and at no cost
to the customer.
Decoding the image to colour:
Once you have a reasonably clear and well-exposed image, you might like to try
generating a colour picture from it. The procedure is quite simple and may be carried
out as follows:
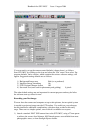
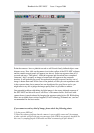
1) Check the ‘Set program defaults’ menu and ensure that the ‘Pixel’ and ‘Line’
offsets are both unselected.
2) Click on ‘Colour’ in the main menu and then select ‘Synthesise Colour Image’.
3) Select ‘Apply Anti-Alias’, but leave the other options switched off.
4) Click on ‘Create Image’.
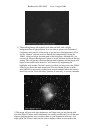
After a few seconds a recognisable colour image should be displayed, although the
colour ‘balance’ may need correction. This is especially true if your image was taken
indoors with artificial lighting, which can make everything look very orange.
If the colour image shows white spots or patches, where no colour is present, then the
original exposure time was too long and some pixels are overloaded. In this case, you
need to take a new image with significantly less exposure time, or with the lens
stopped down a little further.
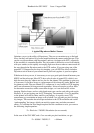
Correcting and refining the colour image:
The colour balance of your image may be adjusted by selecting ‘Colour’, followed by
‘Set Colour Balance’.
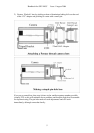
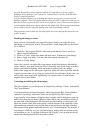
You are presented with three histograms, which represent the Red, Green and Blue
content of your image, with limits, which can be adjusted by slider controls.
A good quality colour image will present three, roughly similar; histograms, and any
small colour bias may be seen as different offsets above zero and different widths of
the main bulk of the histograms. Moving the lower limit setting of a histogram will
adjust the overall colour bias of the picture, with the amount of the particular colour
concerned being reduced by moving the limit in the positive (to the right) direction.
The location of the pointer represents the new ‘zero’ of the histogram. For instance, if
your image is a little too red, you can reduce this by setting the lower pointer on the
red histogram to, say, 4, and then clicking on OK. Equally, you can increase the red
content by reducing both the blue and green content.