


Handbook for SXV-M5C Issue 1 August 2004
9
Your first image may now be reasonably good, but it is unlikely to be as clear and
sharp as it could be. Improved focusing and exposure selection may correct these
shortcomings, and you may like to try them before applying any image enhancement
with the software. However, there will come a point when you say, “That’s the best
that I can get” and you will want to experiment with various filters and contrast
operations. In the case of daylight images, the processing options are many, but there
are few that will improve the picture in a useful way.
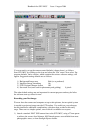
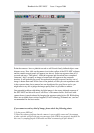
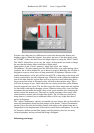
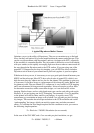
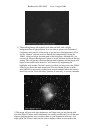
The most useful of these are the ‘Normal Contrast Stretch’ and the ‘High Pass Low
Power’ filter. The high pass filter gives a moderate improvement in the image
sharpness, and the effects of image processing. This can be very effective on daylight
images. Too much high pass filtering results in dark borders around well-defined
features and will increase the ‘noise’ in an image to unacceptable levels, but the ‘Low
Power’ filter is close to optimum and gives a nicely sharpened picture, as above.
The ‘Contrast’ routines are used to brighten (or dull) the image highlights and
shadows. A ‘Normal’ stretch is a simple linear operation, where two pointers (the
‘black’ and ‘white’ limits) can be set at either side of the image histogram and used to
define new start and end points. The image data is then mathematically modified so
that any pixels that are to the left of the ‘black’ pointer are set to black and any pixels
to the right of the ‘white’ pointer are set to white. The pixels with values between the
pointers are modified to fit the new brightness distribution. Try experimenting with
the pointer positions until the image has a pleasing brightness and ‘crispness’.
At this point, you will have a working knowledge of how to take and process an SXV-
M5C image. It is time to move on to astronomical imaging, which has its own,
unique, set of problems!
*********************************************************************
Astronomical Imaging with the SXV-M5C
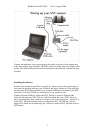
1) Getting the image onto the CCD:
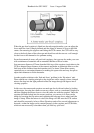
It is fairly easy to find the correct focus setting for the camera when using a standard
SLR lens, but quite a different matter when the M7 is attached to a telescope! The
problem is that most telescopes have a large range of focus adjustment and the CCD
needs to be quite close to the correct position before you can discern details well
enough to optimise the focus setting. An additional complication is the need to add
various accessories between the camera and telescope in order that the image scale is
suitable for the subject being imaged and (sometimes) to include a ‘flip mirror’ finder
unit for visual object location.
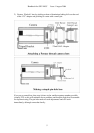
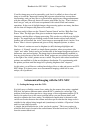
A simple, but invaluable device, is the ‘par-focal eyepiece’. This is an eyepiece in
which the field stop is located at the same distance from the barrel end, as the CCD is
from the camera barrel end.