


2. Take out the hard disk from the compartment by finger carefully
3. Remove the connector from the hard disk gently.
4. Remove the crane screws located at each side of the hard disk.
5. Rotate and tighten the crane screws to the new hard disk.
6. Attach the connector to the new hard disk precisely.
7. Place the hard disk back to the compartment.
8. Cover the lid, then rotate and tighten the screws.
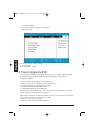
9. Set the boot device as DVD/CD-RW Combo drive and Primary Master as Auto on BIOS
setup menu. Please refer to Chapter 6 about the setting of BIOS setup menu. Then, boot the
system by using WinXP CD-ROM and the system will detect the hard disk automatically and
prompt you how to format the new disk.
• Please tighten the screws located at each side of the hard disk before operating the
hard disk. Any vibration may cause damage for the running hard disk.
• Please contact dealer or certified technician for changing the hard disk drive. The
damage of changing HDD resulting from users may not be under warranty
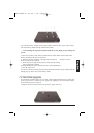
7.3 Wireless Module Installation
This computer uses mini-PCI wireless LAN module at the bottom of this notebook for wire-
less connection.
• Please contact dealer for adding or changing this module. Any damage that caused
by inappropriately adding or changing this module will not be under warranty
English
MANUAL INGLES OK 20/7/06 11:40 Página 90