Page 7
Using the Calculator
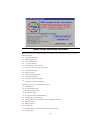
To use the CDML Advanced Calculator, you can click on the buttons or use the key-
board to enter numbers and operators. You can also use the Tab key to move be-
tween buttons and press the Space Bar when you reach the button that you want.
Operators can also be entered from the Operators Menu .
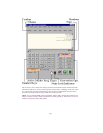
The original calculator mode is Standard Calculator. The current mode is displayed
just below the number Readout, between then Next and Previous Mode buttons. To
change the mode to any of the nine conversion modes, click on the Next Mode but-
ton (right) or the Previous Mode button (left). The ToolTip for the Next Mode button
will show you the upcoming mode. The ToolTip for the Previous Mode button will
show you the preceding mode.
NOTE: You can also switch modes from the Modes Menu.
Any completed operation will be registered on "tape" (The Tape Display). The "tape"
is located above the Readout and reflects everything that you did since you started
the CDML Advanced Calculator or since you last cleared the tape. The tape has
many useful functions. You can search the tape for a specific string or number. You
can print the tape, you can publish the contents of the tape to Notepad (standard
Windows Notepad or any other program, depending on your settings) or you can just
browse the tape to review your calculations.
Most of the calculator functions can be accessed through the menus.
Beneath the "0" button, you will see a small box displaying the modes you turned on.
These modes are as follows:
F
= Financial Calculator Mode
D
= Auto-Decimal Mode
A
= Adding Machine Mode
R
= RPN Calculator Mode
S
= Show Percent Mode
C = Carry Result Mode
%
= Percent for Number Mode
M
= Magic Number Mode
-
(minus sign) = Repetitive Subtraction Mode
I
= Imperial English Measures Mode
T
= Troy English Measures Mode
E
= Repeat Entry Mode
W
= Swap “+“ and “Enter” keys Mode
O
= Copy Formatted Mode
The three buttons in the bottom-right corner are Help, About CDML Advanced Calcu-
lator and Exit CDML Advanced Calculator, respectively.
Above the Tape, you will find a 9-button Toolbar. To use the Toolbar, you must first
configure what function you want each button to perform. This is done by right-
clicking on the button you want to configure. Once the Toolbar is configured, click
the corresponding button to perform that function.
HINT: To view what function the button is configured for, see the ToolTips for that
button.


