


5-4
10 July 1998
Configuring the Software
Turn on the ISP-100. The power switch is located at the far right under the
front access panel. This is accomplished by placing the switch in the
down position. See Figure 2-1 for the location of the power switch.
Check to make sure that the LEDs light in a percentage complete fashion.
Launch the VUE-IT application on the PC.
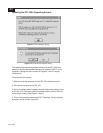
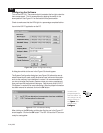
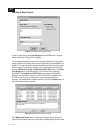
Figure 5-6
System configuration dialog.
A dialog box similar to the one in the Figure 5-6 should appear.
The System Configuration dialog box (see Figure 5-6) allows the user to
select the serial port used, modify directories used, and enter information
such as the company’s and designer’s names. It is recommended that
you do not change the directory names unless you are an experienced
user and know the implications of doing so. See the entry titled “VUE-IT
File System” in section 6 for more information. After the proper information
has been entered or selected, click on the OK button.
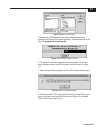
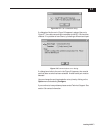
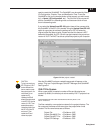
Figure 5-7
ISP-100 detected dialog.
After clicking on the OK button a dialog box like the one in the Figure 5-7
should appear. Click on the OK button. The ISP-100 and the PC are now
ready for use together.
You will not be
prompted again for
this information. You
can change it at any
time by clicking on
the
OptionOption
OptionOption
Option menu
and selecting
ConfigureConfigure
ConfigureConfigure
Configure.