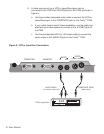
8. Press
VOLUME
to adjust the volume of the P350 built-in speakers.
NOTE: If you have an external powered speaker system plugged into
the
AUDIO OUT
jack, turn it on and adjust the volume of that external
system. (The level at the
AUDIO OUT
jack is controlled by
VOLUME
.)
9. Turn on and play the connected VCR, LaserDisc player, etc.
10. Press
SOURCE
on the P350 keypanel to select one of the video
inputs.
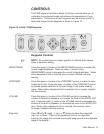
11. To further enhance or change the image on the Firefly™ P350, refer
to the Keypanel and Menu Mode On-Screen Control sections of this
manual.
NOTE: To maximize the image quality of NTSC, PAL or SECAM video,
the On-Screen controls are displayed in a low resolution mode. When
video input is displayed, the On-Screen controls will not appear as sharp
as when a computer input is displayed.
NOTE: Ten seconds after you make a change, the image
enhancements that you have made will be saved. These saved
enhancements will be used as the default settings the next time that you
activate your P350.
12. When your presentation is complete, press
POWER
to turn off the
projector and lamp.
NOTE: The lamp may be turned off, then on again before it is allowed to
cool completely. However, this action will shorten the life of the lamp.
13. After the Firefly™ P350 has cooled and the main cooling fans have
stopped, you may unplug the P350 from the AC wall outlet.
NOTE: To use your computer and monitor without disconnecting them
from the P350, the P350 must be plugged into an AC wall outlet. The
MONITOR
jack on the Firefly™ P350 requires power to operate the
computer monitor.
NOTE: The projector does not need to be turned on to use the
MONITOR
jack.
☞
☞
☞
☞
☞
☞
14 User Manual


