


3. Faxing from Client Computers
44 Network Fax Guide — Faxing from Applications
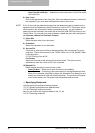
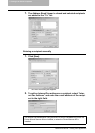
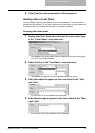
Saving a fax to the default box
1. Display the Send tab and check the “Save as File” box.
2. Select the file format in the “File Format” drop down box.
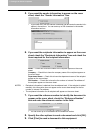
3. Specify the other options to send a document and click [OK].
4. Click [Print] to send a document to this equipment.
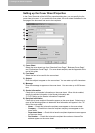
Delayed Transmission
When the delayed transmission is specified, the fax is stored in the fax queue in this
equipment and will be sent on the specified date and time.
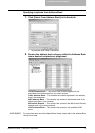
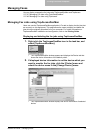
Sending a document on specific date and time
1. Display the Send tab and select “Send Fax Later” in the
“Delayed Fax” drop down box.
2. Click [Edit].
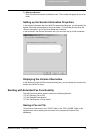
• The Scheduled Time dialog box appears.
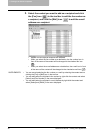
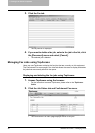
3. Select the date and time and click [OK].
• You can click the Date arrow to display a calendar then allows you to select
an date.
• Enter the time to commence the fax transmission. You can use the up and
down arrows to assist with setting the time with the proper format.
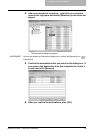
NOTE: The scheduled date cannot be more then one month from the current date. If the cur-
rent month does not have a date like the current date, then the date will be set at the
last day of the following month. For example, if the current date is March 31st. then the
maximum date that can be selected for the scheduled fax is April 30th.
4. Specify the other options to send a document and click [OK].