


2. PRINTER SETUP
ENGLISH VERSION EO1-33028
2.7 Loading the Media
E2- 7
2.7 Loading the Media
2.7.1 Installing the Media
onto the Supply Holder
Unit
The following procedure will outline the steps required to install the
media onto the Supply Holder Unit and adjust its position in the Supply
Holder Frame at the rear of the B-852 printer. The procedure will then
show the steps to properly load the media into the printer so that it feeds
straight and true through the printer.
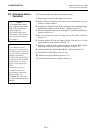
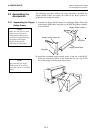
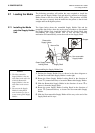
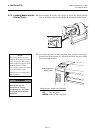
The figure below shows the assembled Supply Holder Unit and the
paragraphs that follow show the step-by-step procedures to disassemble
the Supply Holder Unit, install the media onto the Supply Shaft, then
reassembling the Supply Holder Unit so that the auto centering
mechanism will automatically center the media on the Supply Shaft.
Disassembling the Supply Holder Unit
1.
Position the Supply Holder Unit as shown in the above diagram so
that the Non-removable Supply Holder is at the right.
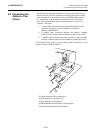
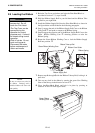
2.
Rotate the Green Supply Holder Locking Knob in the direction of
arrow
c
(counterclockwise) to loosen the Removable Supply Holder.
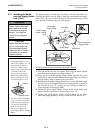
3
. Slide the Removable Supply Holder in the direction of arrow
d
to
remove it from the Supply Shaft.
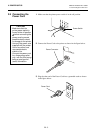
4
. Rotate the green Supply Holder Locking Knob in the direction of
arrow
e
(counterclockwise) to loosen the Non-removable Supply
Holder.
5.
Slide the Non-removable Supply Holder all the way to the end of the
Supply Shaft until it stops.
1
2
3
Non-removable
Suppl
y
Holder
Removable
Supply Holder
Green Supply Holder
Locking Knob
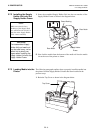
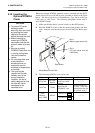
NOTES:
1. The Non-removable
Supply Holder is the one
that slides in the wide slot
while the Removable
Supply Holder is the one
that slides in the narrow
slot.
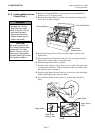
2. Do not turn the Supply
Holder Locking Knob
anti-clockwise too far, or
it may come off the Supply
Holder.
Wide Slot
Narrow Slot
Stopper
Supply Shaft