


Replacement Procedures
Qosmio X500 Maintenance Manual (960-Q08) 4-iii
4.21 Web Camera module................................................................................................ 4-62
4.22 Speaker Box............................................................................................................. 4-64
4.23 Application for thermal pad and grease on CPU, North Bridge, and VGA
Board………………………………………………………………………….....4-67
Figures
Figure 4-2-1 Remove the battery pack.............................................................................. 4-8
Figure 4-2-2 Install the battery pack................................................................................. 4-9
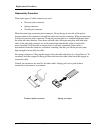
Figure 4-3-1 Remove a PC card...................................................................................... 4-10
Figure 4-3-2 Insert a PC card.......................................................................................... 4-11
Figure 4-4-1 Turn the compute upside down ................................................................. 4-12
Figure 4-4-2 Remove the SSD/MAIN HDD assembly................................................... 4-13
Figure 4-4-3 Remove SSD/MAIN HDD ........................................................................ 4-14
Figure 4-5-1 Remove an optical disk drive..................................................................... 4-16
Figure 4-5-2 Disassemble the side bracket ..................................................................... 4-17
Figure 4-6-1 Remove an optical disk drive..................................................................... 4-19
Figure 4-6-2 Disconnect the slot in ODD from Motherboard ........................................ 4-19
Figure 4-6-3 Disassemble the bracket from slot in ODD ............................................... 4-20
Figure 4-7-1 Turn the computer upside down................................................................ 4-21
Figure 4-7-2 Remove the second HDD assembly........................................................... 4-22
Figure 4-7-3 Remove the screws and HDD holder......................................................... 4-23
Figure 4-8-1 Remove memory slot cover ....................................................................... 4-26
Figure 4-8-2 Remove a memory module........................................................................ 4-26
Figure 4-8-3 Insert a memory module ............................................................................ 4-27
Figure 4-9-1 Remove screws for KB Holder.................................................................. 4-29
Figure 4-10-1 Wireless LAN card ................................................................................... 4-31
Figure 4-10-2 Remove a wireless LAN card ................................................................... 4-32
Figure 4-10-3 Cables layout on motherboard……………………………………….......4-33
Figure 4-11-1 Remove a Bluetooth module……………………………………….........4-34
Figure 4-12-1 TV Tuner card………………………… …………………………… ….4-35
Figure 4-13-1 Remove the screws (securing display assembly)....................................... 4-37