


TL-PS110U Single USB2.0 Port Fast Ethernet Print Server
5
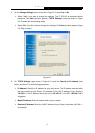
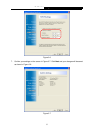
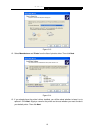
5. On the Change Settings screen as shown in Figure 3-5, select Yes or No.
¾ Select
“Yes” if you want to change the settings. The TL-PS110U is produced without
password. Click Next and then appears “TCP/IP Settings” screen as shown in Figure
3-6. Proceed
with the following steps.
¾ Select “No” if you don’t need to change any settings. Click Next and then appears Figure
3-9. Skip to
Step 8.
Figure 3-5
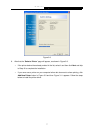
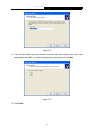
6. On “TCP/IP Settings” page shown in Figure 3-6, check the “Specif
y an IP address” radio
button, and then fill in the following parameters.
¾ IP Address: Specify an IP address for your print server. The IP address must be within
the same subnet as your Router. For example, if the LAN IP address of your Router is
192.168.1.1, the IP address should be set to 192.168.1.X (1<X<255). 192.168.1.10 is
suggested.
¾ Mask IP Address: Enter the subnet mask of your network.
¾ Gateway IP Address: Enter the LAN IP address of your Router. Here takes 192.168.1.1
for example.