


3
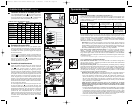
Mounting
Mount your equipment in either a 4-post or 2-post rack or rack enclosure. The user must determine
the fitness of hardware and procedures before mounting. If hardware and procedures are not suit-
able for your application, contact the manufacturer of your rack or rack enclosure. The procedures
described in this manual are for common rack and rack enclosure types and may not be appropriate
for all applications.
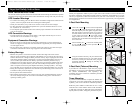
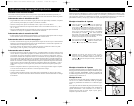
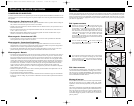
4-Post Rack Mounting
Loosen the wingnuts on each of the two adjustable
side supports ; adjust the length of the supports to
match the depth of your rack; tighten wingnuts. Mount
both side supports in the lowest space of your rack on
the inside surfaces of the rails with user-supplied #10-
32 rack bolts and washers . Note: Both support
ledges should face inward. The side supports’ front
and back holes are threaded and do not require nuts to
secure rack bolts.
Attach mounting ears to the front mounting holes
of your UPS using the screws provided . The
ears should face forward.
Using an assistant if necessary, lift your UPS and slide
it onto the mounting shelves (if your model includes
the shelves). Attach your UPS to the rack by using the
appropriate hardware through its mounting ears
and into the rack rails.
G
FE
D
C
B
A
1
2
3
2
Important Safety Instructions
SAVE THESE INSTRUCTIONS
This manual contains important instructions that should be followed during the installation, operation
and storage of all Tripp Lite UPS Systems. Failure to heed these warnings will void your warranty.
UPS Location Warnings
• Use caution when lifting your UPS. Because of the considerable weight of all rackmount UPS
systems, at least two people should assist in lifting and installing them.
• Install your UPS indoors, away from excess moisture or heat, dust or direct sunlight.
• For best performance, the ambient temperature near your UPS should be between 0° C and
40° C (between 32° F and 104° F).
• Leave adequate space around all sides of the UPS for proper ventilation. Do not obstruct its
vents or fan openings.
UPS Connection Warnings
• The UPS contains its own energy source (battery). The output terminals may be live even
when the UPS is not connected to an AC supply.
Equipment Connection Warnings
• Do not use Tripp Lite UPS Systems for life support applications in which a malfunction or
failure of a Tripp Lite UPS System could cause failure or significantly alter the performance
of a life-support device.
• Do not connect surge suppressors or extension cords to the output of your UPS. This might
overload the UPS and will void the surge suppressor and UPS warranties.
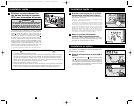
Battery Warnings
• Batteries can present a risk of electrical shock and burn from high short-circuit current.
Observe proper precautions. Do not dispose of the batteries in a fire. Do not open the UPS or
batteries. Do not short or bridge the battery terminals with any object. Unplug and turn off the
UPS before performing battery replacement. Use tools with insulated handles. There are no
user-serviceable parts inside the UPS. Battery replacement should be performed only by
authorized service personnel using the same number and type of batteries (sealed Lead-Acid).
The batteries are recyclable. Refer to your local codes for disposal requirements. Tripp Lite
offers a complete line of UPS System Replacement Battery Cartridges (R.B.C.). Visit Tripp
Lite on the Web at www.tripplite.com to locate the specific replacement battery for your UPS.
• During hot-swap battery replacement, the UPS will not provide backup power in the event of
a blackout or other power interruptions.
• Do not operate UPS without batteries.
• When adding external battery packs connect only Tripp Lite-recommended battery packs of
the correct voltage and type. Do not connect or disconnect battery packs when the UPS is
operating on battery power.
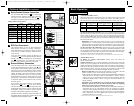
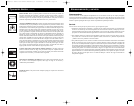
E
D
F
G
2
3
C
C
B
A
1
C
B
C
A
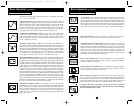
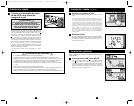
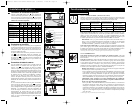
2-Post Rack (Telecom) Mounting
If you mount 3U UPS models in 2-post racks, they require
the addition of a Tripp Lite 2-Post Rackmount Installation
Kit (model: 2POSTRMKIT, sold separately). See
Installation Kit owner’s manual for installation procedure
for 3U UPS models.
Tower Mounting
If you tower mount this UPS, it requires the addition of a
Tripp Lite 2U to 9U tower stand (model: 2-9USTAND, sold
separately). See owner's manual for installation procedure.
Rotate the power module’s Control Panel to view it easier
while the UPS is tower mounted. Insert a small screwdriver,
or other tool, in the slots on either side of the Control Panel.
Pop the panel out; rotate it; and pop the panel back into place.
200505103--Smart 230V Owners Manual.qxd 5/24/2005 11:29 AM Page 2