4
4.3 Components
4. Introduction
(
continued
)
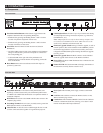
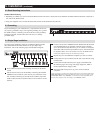
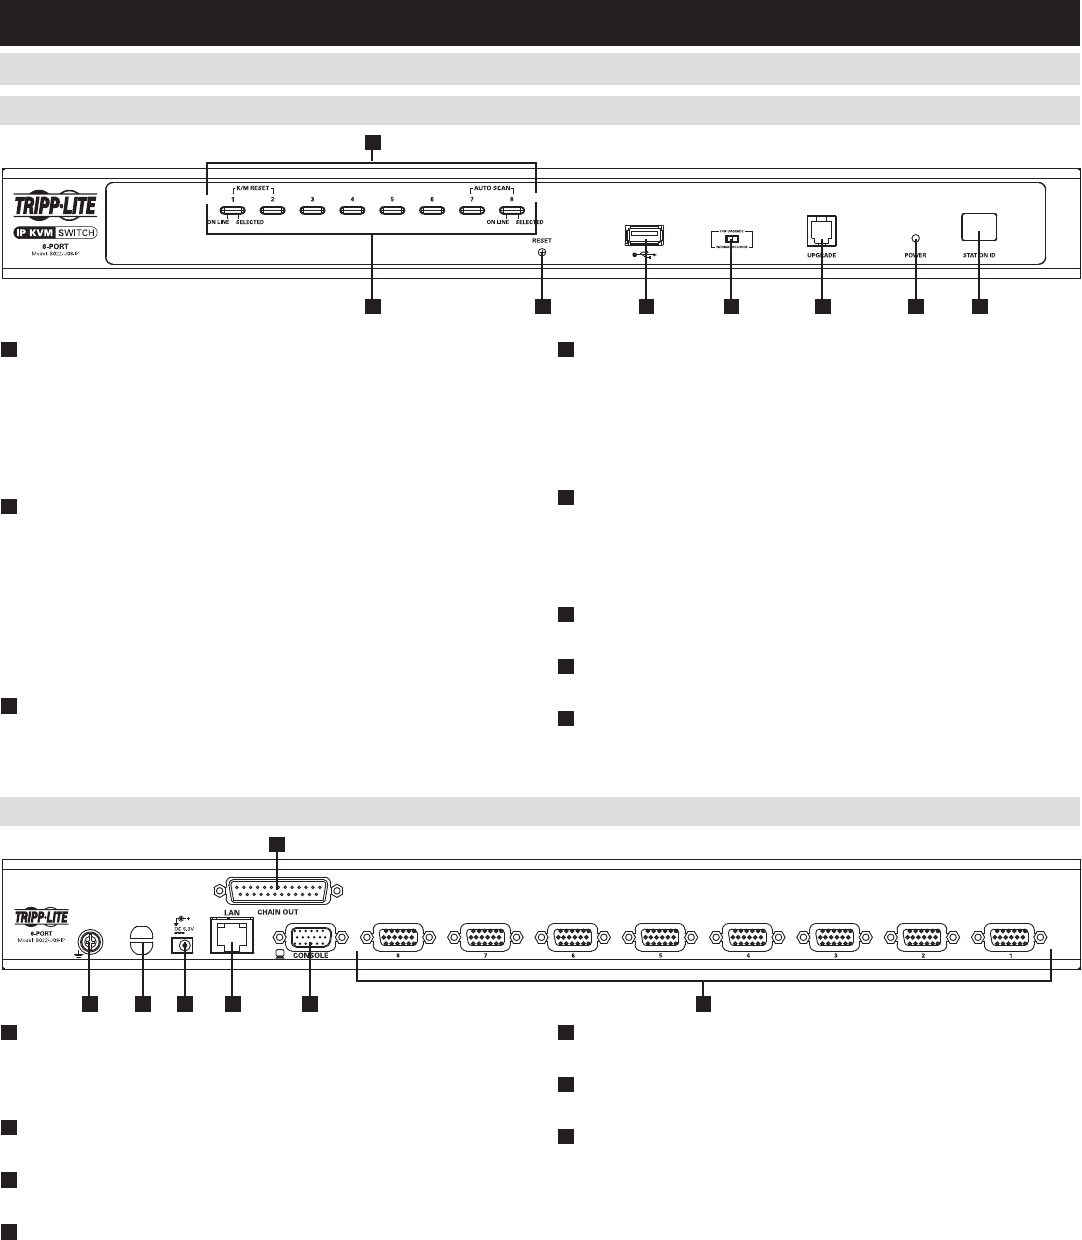
4.3.1 Front View
1
Port Selection Pushbuttons: These buttons toggle between the
computersattachedtothecorrespondingKVMports.
• Simultaneouslypressingandholdingbuttons1and2forthree
seconds will perform a keyboard / mouse reset.
• Simultaneouslypressingandholdingbuttons7and8forthree
seconds will initiate an Auto Scan.
2
Port LEDs: ThePortLEDsarebuiltintothePortSelection
Pushbuttons.
•AnOnlineLEDontheleftsideofthepushbuttonwillilluminate
Orangetoindicatethatapowered-oncomputerisconnectedto
the corresponding port.
•ASelectedLEDontherightsideofthepushbuttonwill
illuminate Green to indicate that the corresponding port has the
focusoftheKVM.
3
Reset Button: Press this recessed button with a thin object to
perform a system reset.
4
USB Peripheral Port: A USB 1.1 port is provided for the sharing
of USB peripherals among connected computers (e.g. flash drive,
CD-ROMdrive,etc.).
Note: USB peripherals can only be shared among computers that
are connected to the KVM switch via the USB connectors on the
P778-Series USB/PS2 Combo KVM Cable Kit.
5
Firmware Upgrade Switch: Duringarmwareupgrade,aswellas
normaloperation,thisswitchshouldbeintheNORMALposition.
If a firmware upgrade does not perform successfully, this switch
is flipped to the RECOVER position during the firmware upgrade
recovery process.
6
Firmware Upgrade Port: TheRJ11connectorontheincluded
rmwareupgradecableconnectstotheKVMswitchhere.
7
Power LED:ThePowerLEDilluminatesbluetoindicatetheunit
is receiving power.
8
Station ID LED: TheStationIDLEDwilldisplaythenumberof
the station that currently has the console’s focus.
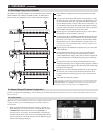
4.3.2 Rear View
1
Daisychain-Out Port: AP772-SeriesDaisychainCable(sold
separately)connectsbetweenthisportandtheDaisychain-InPort
onaB022-U16orB022-016KVMswitchtoexpandthenumberof
connected computers.
2
KVM Ports: ThecustomwiredKVMcablekitsthatconnecttothe
computers plug in here.
3
Grounding Terminal: The wire (user provided) used to ground the
B022-U08-IPconnectstotheKVMhere.
4
Cable Tie Slot: A cable tie can be routed through this slot in order
to tie the connected cables together for organizational purposes.
5
Power Jack: TheincludedpowersupplyconnectstotheKVM
here.
6
LAN Port: ThecablethatconnectstheKVMswitchtoaLAN,
WAN or Internet plugs in here.
7
Console Port: TheincludedUSB/PS2ComboConsoleCableKit
connectstotheKVMswitchhere,allowingyoutoattachaVGA
monitor and USB or PS/2 keyboard/mouse.
2
23 4 5 6 7
3
1
4 5 6 7 8
1


