6
Bits per second: 9600
Data bits: 8
Parity: None
Stop bits: 1
Flow control: None
Installation continued
4-2
Configure Terminal Emulation Program: Open a VT100-compatible terminal emulation
program (such as the HyperTerminal program bundled with Microsoft
®
Windows
®
) on a
computer with an available DB9 serial port. (A notebook computer may be the most
convenient choice.) Set the terminal emulation program to use the COM port that
corresponds to the computer’s DB9 serial port. Specify the parameters required to
communicate with the PDU terminal interface:
If the terminal emulation program supports multiple emulation modes, you may also need
to specify VT100 emulation.
4-3
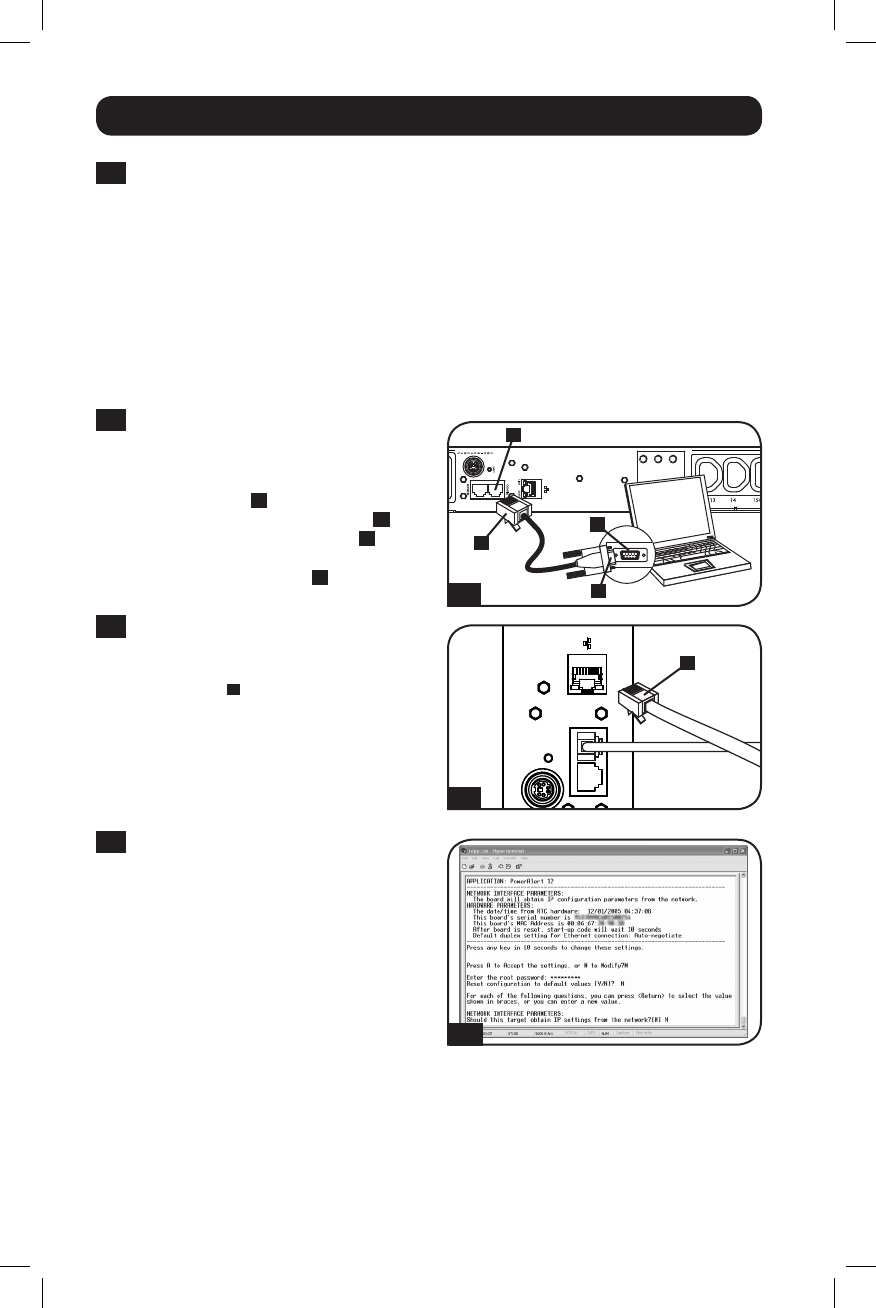
Connect PDU to Computer: Use the
RJ-45 to DB9 serial cable (part number
73-1243) included with the PDU to
connect the PDU to the computer. The
RJ-45 connector
A
at one end of the
cable attaches to the CONFIG port
B
on the PDU. The DB9 connector
C
at
the other end of the cable connects to
the computer's serial port
D
.
4-4
Connect PDU to Network: While the
PDU is powered, connect a standard
Ethernet patch cable to the RJ-45
Ethernet port
A
on the PDU.
Note: This port is not compatible with PoE
(Power over Ethernet) applications.
4-5
Configure PDU in Terminal Mode:
After a brief pause, an initialization page
should appear in the terminal emulation
program. Press any key on the keyboard
within 10 seconds to change the PDU
settings. (If the 10-second period has
elapsed, you can reboot the PDU by
pressing the SNMP reset switch.)
Follow the sequence of responses below
in order to assign an IP address to the
PDU. The default terminal mode root
password is TrippLite. Sample IP settings
are shown - supply your own IP
information when you configure your
PDU.
24 23 22 21
20
19 18 17 16 15
14
13
ENVIROSENSEENVIROSENSE
CONFIGCONFIGACCYACCY
RESETRESET
LINKLINK
STATUSSTATUS
12
11 10 9 8 7
6 5 4 3
2 1
INLET
4-3
4-4
4-5
A
A
B
C
D
201112142 933151.indb 6 1/24/2012 2:09:55 PM


