


Installation Planning Guide Installation
DocuTech/DocuPrint 75/90 and DocuPrint 75 MX 4-13
• Power-off the peripherals, the modem, the CPU, and then the
monitor using the correct shutdown procedure.
• Unplug the power strip from the wall.
• Unplug the CPU, the monitor, the modem, and the
peripherals from the power strip.
• Disconnect the CPU from the printer.
• Disconnect the CPU from the monitor, keyboard and mouse.
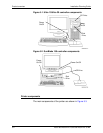
• If the monitor, keyboard and mouse are on the top of the
printer, remove them before moving the printer.
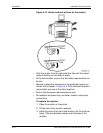
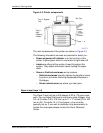
To remove the monitor:
1. Ensure that the monitor is unplugged from the power strip.
2. Face the back of the monitor.
3. Tilt the back of the monitor upwards.
4. Locate the two retainers (one on each side of the base of
the monitor) holding the wire brackets in place.
5. Unscrew the two 12 mm screws from each of the two
retainers.
6. Remove the retainers.
7. Save all removed hardware. (You will need this hardware
when you reinstall the monitor.)
8. With the monitor back tilted upwards, rotate the rear wire
bracket upward, then lift upward to remove.
9. Face the front of the monitor.
10.Tilt the front of the monitor upward.
11. Rotate the front wire bracket upward, then lift to remove.
12.Save all removed hardware. (You will need this hardware
when you attempt to reinstall the monitor.)
13.Lift up the monitor and place it on a wheeled cart for
transport to the new location.
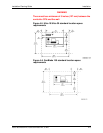
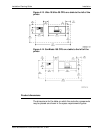
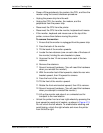
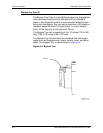
• Unlock the printer front and rear right wheels by pressing the
lever upward on each set of casters, as shown in Figure 4-15.
Do not unlock the left wheels. To enable better steering and
avoid tipping, unlock the right wheels and move the printer
from the left to right.