


37 Synchronization
User’s Guide
Connections and setup
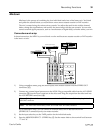
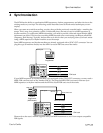
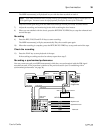
1) Plug a compatible cable from the TAPE OUT - SYNC/4 (k) connector into the MIDI/FSK input on
your sequencer, rhythm machine, or converter.
Set the connected MIDI instrument to FSK sync mode, to receive the FSK signals from the MT4X. Set
any other connected MIDI instruments to MIDI clock mode to slave to the MIDI device receiving the
FSK signals. Perform any other required setup on your MIDI instruments to ensure they perform
correctly once the MT4X starts playing the FSK signals.
Please refer to the instruction manual supplied with your MIDI instrument for further setup details.
2) Connect your MIDI instrument(s) to a monitor mixer. Then connect the input source for each
channel to the corresponding MIC/LINE INPUT connector.
Adjust the input and monitor levels. See "Overdubbing" on page 19.
3) Press the REC SELECT keys for the tracks you want to record.
The corresponding REC SELECT - TRACK indicator on the display will flash.
4) If dbx™ system is on, press the SYNC key. The SYNC indicator will light.
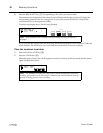
Rehearsal
5) Press the REHE key to put the MT4X into rehearsal mode.
6) Press the PLAY key to start playback.
Tip: You may find it easier to have just one monitor channel to adjust. Plug a cable between the
MONITOR OUT connectors and the input channels of the monitor mixer.
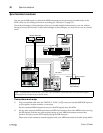
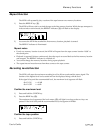
MIDI Converter
(MIDI Master)
FSK Signal
MIDI OUT
FSK track
Track 1Track 1
Track 2Track 2
Track 3Track 3
Track 4Track 4
Overdub track
TAPE OUT
SYNC/4
Monitor signal
MIDI IN
MIDI IN
MIDI IN
MIDI OUT
MIDI OUT
Synthesizer
Sequencer
Rhythm
Programmer
MIC/LINE
1
Monitor Mixer
TAPE SYNC IN