


P4T/RP4T
User Guide
13
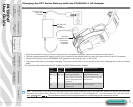
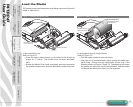
Charging the P4T Series Battery with the AT18488-2 DC Adapter (Customer ordering
p/n AK18913-015)
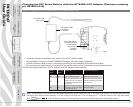
Figure 4C: Charging the P4T Series Battery with the DC Adapter (Vehicle Cradle)
DC Power Cord
(open wires)
P4T Vehicle Cradle
DC Adapter
p/n AT18488-2
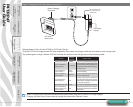
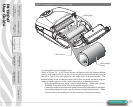
Access the charger
receptacle located
on the bottom
of the vehicle
cradle as
indicated..
• Locate the charger receptacle on the bottom of the P4T vehicle cradle.
• Plug the Molex connector of the AT18488-2 DC adapter into the charger receptacle.
• Connect the black cable ground (-) terminal to vehicle ground (preferably at the vehicle fuse box).
• Connect the white cable power (+) terminal to the vehicle power source (preferably at the vehicle fuse box).
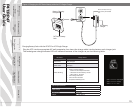
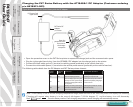
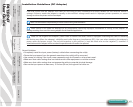
The following table details how the DC Adapter and P4T Series printers interact:
Printer
Status
Charging
Status
Printer LCD Power Button Operation
O O O Pressing turns printer On
On O Normal display operation Pressing turns printer O
On On
Normal display operation, plus
battery icon will cycle through
level bars. Charging will continue
as required..
Pressing switches printer to limited
operation: only battery charging &
LCD functional
O On
Battery icon will cycle through
level bars. Printer turns o at
end of charge cycle.
Pressing turns printer On. Printer
will run normally
Note: If the battery is out of its safe charging temperature range (either too hot or too cold) the printer will display the following:
“Charging will resume when battery is in the range 0-40 degrees C (32-104 degrees F)” and the battery icon will alternately
ash
and . Once the battery reaches a safe charging temperature, normal charging will automatically resume.
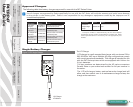
Printer Preparation
pg. 7
Connecting the
Printer pg. 27
Radio Regulatory
Information pg. 31
RP4T Printers pg.
35
Maintenance pg. 36
Troubleshooting pg.
38
Speci cations pg.
43
Appendices pg. 46 Index pg. 52
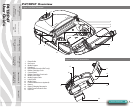
P4T Overview-
pg. 5
Manual
Introduction pg. 4