


Chapter 1 Installing Your Faxmodem 7
to remove the old modem. Continue with step 3 be-
low.
3
Before you start the hardware installation, close
all running programs and shut down Windows if
you have not already done so. Then turn your
computer off and unplug it. Don’t plug it back in
or turn it on until you complete the faxmodem
hardware installation.
4
Take the cover off your computer. If you are not fa-
miliar with the procedure, consult your computer’s
manual for instructions.
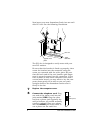
5
Unscrew and remove the metal cover plate on the
rear of the computer that lines up with an available
PCI slot. The PCI slot is shorter than a 16-bit ISA
slot and usually a different color (ISA slots are typi-
cally black or brown; PCI slots are usually white or
gray). Your faxmodem has two sections of gold con-
necting fingers, and a PCI slot has two sections that
match the sections on the faxmodem.
If you are replacing an older modem, now is a
good time to remove it. (It may be in a non-PCI slot,
which you cannot use for your new faxmodem.)
Look for an add-in board with one or more phone
jacks on it. To remove the old modem, first unplug
any phone cords connected to it. One cord is proba-
bly the connection to your telephone. You can reuse
this connection with your new faxmodem. The other
cord is probably the connection to your telephone
line at a wall jack. It is a good idea to replace this
cable with the one that came with your new faxmo-
dem.
Unscrew the screw on the bracket and lift the old
modem board from its slot.
Note: Most of the boards inside your computer
have tiny wires sticking out underneath. These
wires can be sharp. Be careful not to cut your
hands on them.
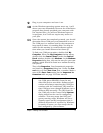
6
Make a note of the serial number on your new fax-
modem. Record the number in the Important In-
formation table on page 32 of this manual.