


3
USING THE
LOCAL CONFIGURATION MANAGER
Initializing the NJ220
IntelliJack
Once you have installed the NJ220 hardware on your network and the Local
Configuration Manager software on your computer, you need to perform an
initial configuration of the IntelliJack.
1 The first step is to connect your computer to the NJ220 that you are installing.
Attach an Ethernet cable from a computer running the Local Configuration
Manager software to any one of the four personal area network (PAN) ports on
the front of the NJ220.
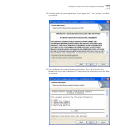
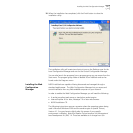
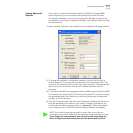
2 Click on the desktop shortcut icon labeled IJ NJ Local Config Mgr to start the
program. When it launches, you will see a window like this:
3 The MAC address, Serial Number, and Firmware Version of the currently
connected NJ220 will appear at the top of the window. If you connect to another
NJ220, you must click the Query button to refresh the window.
If you are not connected to any IntelliJack, the field will display the message Not
Connected. If the Not Connected message appears, check your connection to the
IntelliJack and click the Query button.
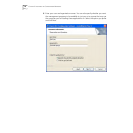
4 Make sure the General tab is selected.