


xiii
4.5 Installing and Removing Expansion Boards.......................................................4-11
4.5.1 Installing a PCI Card..................................................................................4-11
4.6 Installing Additional Memory............................................................................4-13
4.6.1 Installing a DIMM......................................................................................4-14
4.6.2 Removing a DIMM.....................................................................................4-15
4.6.3 Reconfiguring the System ...........................................................................4-15
4.7 Upgrading the CPU ...........................................................................................4-15
4.7.1 Removing the Pentium II CPU....................................................................4-16
4.7.2 Installing a Pentium II CPU........................................................................4-17
4.7.3 Installing the Celeron CPU .........................................................................4-19
List of Figures
Figure 1-1 Front Panel ..............................................................................................1-2
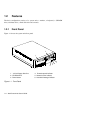
Figure 1-2 Rear Panel................................................................................................1-3
Figure 1-3 Connecting the Keyboard .........................................................................1-4
Figure 1-4 Connecting the Monitor ..........................................................................1-5
Figure 1-5 Connecting the Mouse.............................................................................1-6
Figure 1-6 Connecting the Parallel Printer ...............................................................1-7
Figure 1-7 Complete System Connections..................................................................1-8
Figure 1-8 Connecting Multimedia Components ......................................................1-9
Figure 1-9 Connecting to the Network.....................................................................1-10
Figure 1-10 Connecting the Telephone Line and Handset to the Fax/Modem...........1-11
Figure 1-11 Connecting USB Devices....................................................................1-12
Figure 2-1 System Board Layout................................................................................2-4
Figure 2-2 System Board Jumper and Connector Locations .......................................2-5
Figure 4-1 Jumper Setting Label Location .................................................................4-3
Figure 4-2 Removing the Screws...............................................................................4-4
Figure 4-3 Removing the Housing Cover...................................................................4-5
Figure 4-4 Replacing the Housing Cover ...................................................................4-6
Figure 4-5 Securing the Screws .................................................................................4-6
Figure 4-6 Detaching the Metal Cover.......................................................................4-7
Figure 4-7 Removing the Drive Frame with CD-ROM, hard disk, and 3.5-inch Diskette
Drives .......................................................................................................................4-8
Figure 4-8 Removing the Hard Disk Drive ................................................................4-9
Figure 4-9 Removing a Hard Disk Drive from the Bracket.......................................4-10