


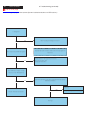
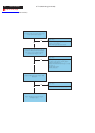
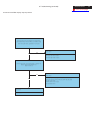
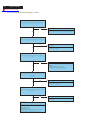
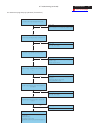
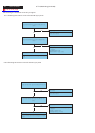
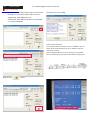

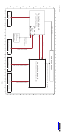

PRINTERPLUG
DVIEXTENDING
SOCKET
USBA
PLUG
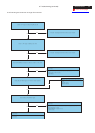
D-SUBPLUG
DVIEXTENDING
SOCKET
USBA
SOCKET
1 Writing EDID Procedure
Hardware Configuration:
1.)Connect the PRINTER PLUG of DDC FIXTURE with the
printer port of Desktop PC. (Refer to figure 1)
2.)Plug USB A PLUG of DDC FIXTURE to USB socket of
Desktop PC (Refer to figure 2)
3.)Extend the DVI cable on DVI EXTENDING SOCKET of DDC
FIXTURE. (Refer to figure 3)
4.1)Connect the D-sub plug of Chroma with D-SUB PLUG of
DDC FIXTURE (Refer to figure 4)
4.2) Take a video cable then connect the D-SUB PLUG and the
D-sub socket of monitor. (Refer to figure 5)
5.)Connect the extended DVI cable to DVI socket of monitor
(Refer to figure 5)
6.)Re-confirm all the connectors are connected well.
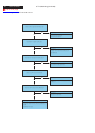
1
2
3
4
5
6
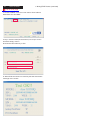
CAUTION: The timing of Chroma shall be setup at T254/ P41
before data recording. the detail setting parameter from
chroma .Please See below photo
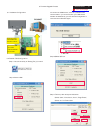
2. Writing VGA/DVI Process
Chose the folder:” ” or “Acer-
X193H-X203H” it depends on which model you want to write.
Select the “Acer-M1&M3-XPEDID-DVI-.exe” to execute it
Acer-X193H-X203H-digital signal
Acer-X193H-X203H be used in the monitor only has VGA
port.
Acer-X193H-X203H-digital signal be used in the monitor both
have VGA and DVI port
3.Select Model: Key in password”cedid” then select model
which one you want to write EDID code that it depends on
panel type.
cedid
33
Go to cover page
7. Writing EDID Process
ACER X193HQ