


6
Go to your system BIOS Setup routine and find the Plug-N-Play settings.
These settings can be found within the Advanced, PNP/PCI Configuration,
or Plug and Play Configuration sections depending on the BIOS Manufac-
turer. Next, verify that one free IRQ has been set so that the ISA bus has
access to it (some BIOS dont allow individual selection of interrupts to ISA,
Plug-N-Play, or PCI). These settings can be called ICU, ICU/PCI, or PNP
depending on your BIOS version and manufacturer. Do not set this interrupt
to PCI only. Pay attention to the IRQ usage of the other peripherals in your
system. Do not reassign an interrupt that is already in use by another device.
Since each BIOS manufacturer has a different way of handling these configu-
rations, you may have to use trial-and-error to get your modem properly con-
figured. Be sure to Save the settings before exiting the BIOS Setup.
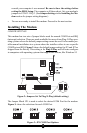
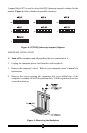
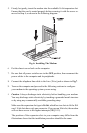
You are now ready to install the modem. Proceed to the Installing the Mo-
dem section.
For WINDOWS NT 4.0 INSTALLATION
If you are replacing the current modem in your computer system with this
new modem, be sure to remove all other modem drivers from your operating
system. Go to: Start-Settings-Control Panel and double-click on the Mo-
dems icon. Highlight the modem you wish to remove and click the Remove
button. Shutdown the computer, power-down, and physically remove the old
modem from your system. Do not install your new modem at this time. Fol-
low the procedures below to help insure a trouble-free installation. Note:
once you remove the old modem and its drivers from your system, you will
need the old modem driver diskette if you wish to reinstall it at a later date.
It is seriously recommended that you DO NOT use the Plug-N-Play capabili-
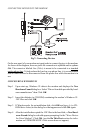
ties of the modem for a Windows NT installation. Instead, manually set the
modems jumpers to COM 2 - IRQ 3 (see Jumper Settings in the Installing
The Modem section). The use of a COM 2 - IRQ 3 setting will provide the
least amount of system reconfiguration and aggravation for the installer. This
setting will require that you disable your computers on-board COM2 Port.
To disable COM2, boot your system and enter your BIOS setup. You can
normally invoke the BIOS setup menu by pressing a key or a combination of
keys at the first boot up screen. Some of the common keys are Del, F1, F2,
Ctrl+Alt+S, Ctrl+Alt+Esc. If none of the mentioned key combinations work,
please refer to your computer system manual for instructions on how to in-
voke the BIOS setup.
Once inside the BIOS setup, find the menu for integrated peripherals, locate
the COM port settings, then disable COM2 or Comport B. If unsure, please