


ADCP-90-250
Issue 1, November 1996
Page 6
1996, ADC Telecommunications, Inc.
2.INSTALLATION
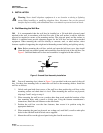
Warning
:
Never install telephone equipment in a wet location or during a lightning
storm. When installing or modifying telephone lines, disconnect lines at the network
interface before working with uninsulated lines or terminals to prevent electrical shock.
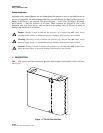
A.Wall Mounting the Wall Box
2.01
It is recommended that the wall box be installed on a 3/4-inch thick plywood panel
attached to the wall, in accordance with local fire code. If the wall surface is uneven, shim the
plywood as required to ensure a flat mounting surface. The plywood panel and the surface to
which it is attached must provide adequate support for the wall box and any other attached
equipment. When mounting the wall box directly to concrete, steel, or other surface, select
fasteners capable of supporting the weight and withstanding normal cabling and splicing activity.
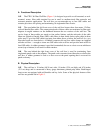
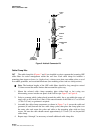
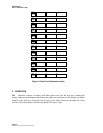
Note
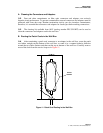
: Before mounting the wall box, unlock and open the left front cover, then install
(from the back) any needed ground stud assemblies near the left side of the wall box. See
Figure 5. Sufficient hardware for four stud assemblies is supplied with the wall box.
STUD
8518-A
NUTS
WASHERS
BACK OF
MODULE
Figure 5. Ground Stud Assembly Installation
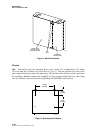
2.02
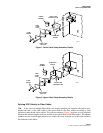
Four wall mounting slots (shown in Figure 3) are provided in the rear panel of the wall
box. Use these four mounting holes to attach the wall box to the mounting surface. Install the
wall box as follows:
1. Unlock and open both front covers of the wall box, then position the wall box on the
mounting surface and check that it is level. When mounting the wall box on plywood,
skip steps 2 and 3 and go to step 4.
2. When mounting the wall box on a surface other than wood, mark the locations of the
four mounting holes with a pencil or felt-tip pen. Using the fastener manufacturer’s
instructions, install the wall fasteners at the four marks.
3. Position the wall box over the four fasteners, then secure it in position using the
appropriate hardware.
4. When mounting the panel on plywood, use a sharp awl, small drill, or nail to make pilot
holes for the four half-inch #6 wood screws supplied.
5. Mount the wall box on the plywood panel using the four #6 wood screws.