E–68 Appendix C: Installing SIMMs
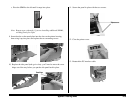
7. Remove and save the two screws on the left of the metal plate covering
the internal board, then pull the plate out about an inch and lift it out.
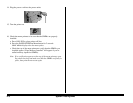
8 Install the SIMMs:
a. Locate the three SIMM sockets on the board. Always install SIMMs in
the sockets from left to right.
b. Insert the gold metallic contact edge of the SIMM into the socket at
about a 45 ° angle, with the notched corner of the SIMM at the
bottom. Push in until the gold contacts are fully inserted into the
socket.
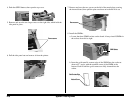
4. Push the OPEN button, then open the top cover.
5. Remove and save the two large screws on the right side, which hold the
side panel in place.
6. Pull the side panel out and remove it from the printer.
Remove screws
Remove screws
Notched Corner
SIMM Sockets
Gold Contacts Edge


