


Installation and Safety Guide 21
613-000313 Rev C
6. Save the configuration.
The first time you start the router, it uses the default configuration in the file
boot.cfg.
Save your configuration to a new file, and set the router to use this file when it
restarts. We strongly recommend leaving the boot.cfg file unchanged, in case you
need to revert to the original default configuration. Some wizards save the
configuration automatically. If your configuration is not saved yet, the Save
button is red.
7. Advanced configuration.
If necessary, use the command line to complete the configuration if necessary
(“Using the CLI to configure the AR415S” below). Use the commands in the
Software Reference.
Using the CLI to configure the AR415S
This section describes how to access the CLI via a switch port in VLAN1 on the
AR415S routers, when the PC and the router are in the same subnet, in order to
configure the router.
Caution Only one DHCP server should usually be enabled on a network. If
you have an existing DHCP server, we recommend disabling either it or the
router’s DHCP server. To disable the router’s DHCP server, use the
command:
disable dhcp
If another device on your network already uses the router’s default IP address,
do not connect the router to the network until you have changed the IP
address of the router’s default VLAN. Using the command line, enter the
command:
set ip interface=vlan1 ip=ipaddress mask=mask
See the Internet Protocol (IP) chapter in the Software Reference.
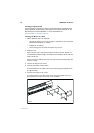
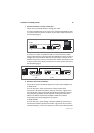
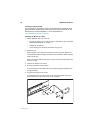
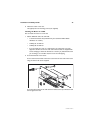
1. Initiate router start-up.
Using the terminal cable supplied, connect a VT100-compatible terminal, or the
COM port of a PC running a terminal emulation program such as Windows
Hyper Terminal, to the Console RS-232 (ASYN0) port on the router’s rear
panel.