


Installation and Safety Guide 9
613-000313 Rev C
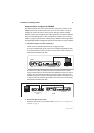
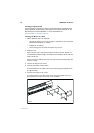
3. Connect the provided power cord to the AC power inlet and clip it in place.
Switch the router’s power switch to the ON position. The Power LED lights
continuously and the System LED lights briefly. The Port LEDs also light briefly.
The router is supplied with an approved power cord that incorporates a
moulded plug. It must only be used with the power cord supplied.
If the LEDs fail to light, the most likely cause is that the router is not receiving
power. Check that:
■ the power supply outlet’s switch (if any), and the router’s power switch, are in
the ON position
■ the power cable is securely plugged in
■ the power supply is operational
Configuring the AR450S
You can configure the router via the command line interface (CLI) or the graphical
user interface (GUI). First use the CLI to assign an IP address to the router, then use
the CLI or the GUI to complete the configuration.
■ “Using the CLI to configure the AR450S” below
■ “Using the GUI to configure the AR450S” on page 11
Using the CLI to configure the AR450S
This section describes how to access the router’s command line interface (CLI)
using a terminal or PC connected to the router’s console port.
1. Initiate router start-up.
Using the terminal cable supplied, connect a VT100-compatible terminal, or the
COM port of a PC running a terminal emulation program such as Windows
Hyper Terminal, to the Console RS-232 (ASYN0) port on the router’s rear
panel.
Set the communication parameters on your terminal or terminal emulation
program to:
• Baud rate: 9600
• Data bits: 8
•Parity: None
•Stop bits: 1
• Flow control: Hardware
See the AR400 Series Router Hardware Reference for more information on
configuring emulation software.