


2. Hardware Setup
13
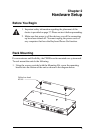
Setting Up
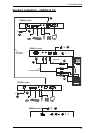
Setting up the USB KVM Extender System is simply a matter of plugging in
the cables. Refer to the diagrams on the following pages as you perform the
following steps (the diagram numbers correspond to the numbers of the steps):
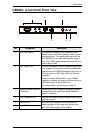
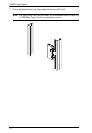
1. Plug the cables from the local console devices (mouse, keyboard, monitor,
microphone and speakers) into their ports on the rear panel of the Local
Unit (CE800
BL). The connectors are color coded and marked with an icon
to identify themselves.
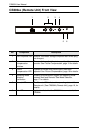
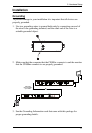
2. Plug the KVM connectors on the custom KVM cable provided with this
package into the KVM ports on the CE800
BL’s front panel.
For a standard CE800
B-to-PC installation, progress to 3.
If you are combining a KVM switch with your CE800
B installation,
progress to 4 and refer to the diagram on page 16.
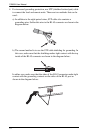
3. For a standard CE800
B-to-PC installation:
a) Plug the connectors on the other end of the KVM cable into the
appropriate ports on the computer system. The connectors are color
coded and marked with an icon to identify themselves.
b) Next, use the USB cable provided with the CE800
B package to connect
the USB Type B port on the front of the CE800
BL to a USB Type A port
on the computer.
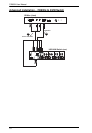
4. For a CE800
B-to-KVM switch installation:
a) Plug the connectors on the other end of the KVM cable into the
appropriate ports on the Console section of the KVM switch. The
connectors are color coded and marked with an icon to identify
themselves.
b) Next, use the USB cable provided with the CE800
B package to connect
the USB Type B port on the front of the CE800
BL to the USB Type A
keyboard port on the KVM switch.
Note: To ensure that the CE800B’s keyboard hotkey function is supported,
make sure that the USB cable is connected to the keyboard USB port
on the KVM switch and not the mouse USB port.
(Continues on next page.)