


3
CHAPTER
2
Installation
Getting Started
Before installation, refer to the list below to ensure that you have all the items that shipped with the
AutoView Wireless switch.
Supplied with the AutoView Wireless switch
• One AutoView Wireless transmitter or receiver per computer/user
• A power supply for each transmitter or receiver
• Audio cable
• AutoView Wireless Installer/User Guide
• AutoView Wireless Quick Installation Guide
Installing an AutoView Wireless Switch
Follow the step-by-step procedures listed in the To connect a computer and To connect a user
sections to properly install your new wireless KVM switch system.
WARNING: To reduce the risk of electric shock or damage to your equipment - Disconnect the power from
the unit by unplugging the power supply from the electrical outlet.
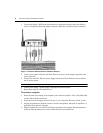
To connect a user:
1. Select a location for your AutoView Wireless receiver. Find a convenient position for locating
the AutoView Wireless receiver, such as a desktop that is near your extended display. Best per-
formance is achieved when the antennas are clearly visible and free from obstructions.
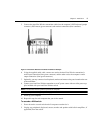
2. Connect the display’s video input into the AutoView Wireless receiver’s video input (blue con-
nector).
Virtually any industry-standard display device can be attached to the AutoView Wire-
less receiver as long as it has a 15-pin D shell connector for video input and can accept VGA
(640 x 480), SVGA (800 x 600) and XGA (1024 x 768) resolution video.
NOTE: The extended display must have a standard 15-pin D-shell RGB analog interface.