


Installing the AXIS 250S AXIS 250S User’s Manual
10
Installing the AXIS 250S
This section is intended for use by the product administrator. Operators and viewers should
read Operating the AXIS 250S, on page 14.
• Quick installation - Follow the instructions below to quickly install on an Ethernet network.
• Easy installation - See Using the AXIS IP Installer, on page 35.
• Other Methods - Please refer to Other IP Setup Methods, on page 35.
❹
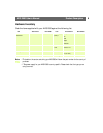
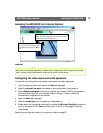
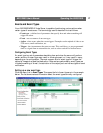
Using an appropriate method for your operating system, assign your product with a
unique IP address from a computer on your network, as follows:
You will now see ‘
Request timed out...’ messages repeatedly returned in the window.
Note: In some Unix systems, the arp command can be located in a directory that is not on the
command path.
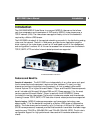
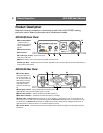
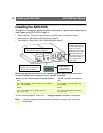
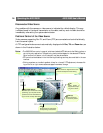
❸Note the Serial number on the
underside of the unit. You need to
know this to set the IP address.
Serial number same as
Ethernet address; e.g.
00408c100086 =
00-40-8c-10-00-86
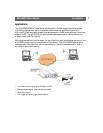
❷Connect a video source to
the BNC or S-Video connec-
tor. (Use a BNC-to-RCA con-
verter if your source is
supplied with a phono-type
(RCA) connector.) The 75 Ohm
selector switch should nor-
mally be set to ON. If the unit
is connected in parallel (e.g.
with a monitor) set this
switch to OFF.
❶Connect a microphone to the Mic connector, or
an alternative input device to the Line input.
Windows only - Start a Command prompt and type these commands:
Syntax:
arp -s <Server IP address> <Ethernet address> <my PC IP address>
ping -t <Server IP address>
Example:
arp -s 172.21.1.200 00-40-8c-10-00-86 172.21.1.193
ping -t 172.21.1.200
UNIX only - Type this in your command line:
Syntax:
arp -s <IP address> <Ethernet address> temp
ping <IP address>
Example:
arp -s 172.21.1.200 00:40:8c:10:00:86 temp
ping 172.21.1.200