


27
CHAPTER 4: Configuration
4.2 Configuring the Extender
The ServSwitch Wizard Extender ships from the factory in a default state that’s
suitable for most applications, but it has a large number of configuration options.
You’ll set different options using one of two different methods:
• Set the 8-position DIP switches on the Extender’s receiver and transmitter (see
Section 4.2.1) to select automatic or manual video compensation, the
keyboard hotkey combination, and other hardware-related functions.
• Manual video compensation and other advanced options are controlled with
keyboard commands after the Extender is placed in “configuration mode” (see
Section 4.2.2). When you exit configuration mode, any new settings are saved
in the receiver’s nonvolatile memory.
4.2.1 S
ETTING THE
DIP S
WITCHES
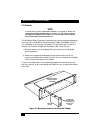
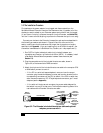
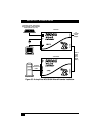
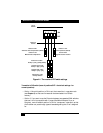
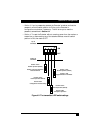
You can use the DIP switches on the sides of the Extender receiver and transmitter
to set several configuration options. The switches are continuously read by the
Extender and may be changed while it’s powered on. The default settings (all
switches OFF) are suitable for most installations. The DIP switches are shown in
Figures 4-1 and 4-2 on the following pages. They have these functions:
Receiver’s DIP switch:
• Position 1: Leave this position OFF for normal operation (the default setting).
Move it to ON to put the receiver in upgrade mode (see Chapter 6) so that
new firmware can be downloaded into its flash memory.
• Positions 2 and 3: Use these positions to select which keystroke combination the
Extender will recognize as its hotkey (see Section 5.5): Both OFF = [Ctrl] +
[Shift] (the default setting); 2 OFF and 3 ON = [Alt] + [Shift]; 2 ON and 3
OFF = [Ctrl] + [Alt]; both ON = no hotkey (hotkey functions disabled).
• Position 4: Leave this position OFF for automatic video compensation (the
default setting). In this mode, the Extender will check the length of the
twisted-pair cable linking the transmitter and receiver when they are powered
on, then adjust its video-compensation amplifiers.
Move this switch position to ON for manual compensation. In this mode, the
video-compensation setting may be adjusted by the user as described in
Section 4.2.2.A.