


Canon MultiPASS C50 Getting Started ENGLISH
II-16
Scanning with the Desktop Manager (6-4)
You can use the C50 and the Desktop Manager to scan a monochrome image of a
document. The resulting document in the Desktop Manager is automatically
provided a unique system-assigned name. You can rename the document later.
Each image you scan is placed in the Scan folder as a TIFF document. A scan
document remains in the Scan folder until you move or delete it. The scan
document can be reviewed, annotated, printed, or sent as a fax. For more
information on these tasks, refer to Chapter 7, ”Working with Documents in the
Desktop Manager.”
The following instructions summarise the procedures for scanning an image.
To scan an image with the Desktop Manager:
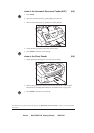
1. Place the image you want to scan face down in the ADF (automatic
document feeder) of the C50.
2. In the Desktop Manager, click Monochrome Scan on the Tools menu or
toolbar.
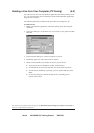
3. In the ScanGear window, specify the following preview scan options for your
document as needed: Scan Mode, Scan Resolution, Preferences, Page Size,
and Black and White Options (if applicable).
4. Click Preview.
5. Review the display of your scanned preview image in the scan window.
Adjust the properties of your image as needed for the final scan.
6. Replace your document in the document feeder of the C50.
7. Click Scan.
The numbers in parentheses indicate the pages in the MultiPASS Desktop Manager for Windows User’s Guide on
which you can find detailed information.