


E-29
• Use a tape width of at least 18mm when received data
item character size is increased vertically by a factor of
two.
• None of the following functions can be used with received
data: frames, preset formats, auto sizing, preset layouts,
block operations, proportional character spacing, smooth-
ing, character input settings, character deletion, text stor-
age into memory, text recall from memory.
• The printer returns to the screen in step 4 (the one that
appears after data communication is complete) after print-
ing is complete.
8. After printing is complete, press ESC SET to quit data
communications.
• All received data is cleared from label printer memory when
you quit data communications.
9. Turn the label printer and graphic scientific caluculator
off and disconnect the cable.
Part 14 Reference
This section contains information about the label printer that
you can use as reference when you need it.
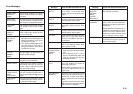
Cleaning the Printer Head and Roller
A dirty printer head and roller can result in poor printing
quality. If you have problems with print quality, use the fol-
lowing procedure to clean the printer head and roller.
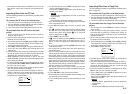
To clean the printer head and roller
1. Make sure the label printer is turned off.
2. Press the tape cartridge compartment cover release and
open the compartment cover.
3. Remove the tape cartridge.
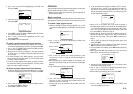
4. Use a cotton swab dipped in alcohol to clean the printer
head and roller as shown in the illustration.
5. Replace the tape cartridge and close the compartment
cover.
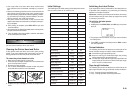
Initial Settings
The following are the initial settings of the label printer when-
ever you turn it power on or reset the unit.
Item Power On Reset
Display Cleared Cleared
Memory Retained Cleared
User Characters Retained Cleared
Calendar Week Start Day Sunday Sunday
Horz/Vert Horizontal Horizontal
Text Alignment Left Left
Justification Justified Justified
Character Spacing Narrow Narrow
Block Length Auto Auto
Mirror Printing Normal Normal
Proportional Spacing On On
Smoothing On On
Block Spacing Narrow Narrow
Auto Feed Long Long
Tape Length Auto Auto
Block Alignment Left Left
Default Font Retained Sans-Serif
Insert/Overwrite Insert Insert
Contrast (32 levels) Retained Level 17
Density (5 levels) Retained Level 3
Sound On On
Language Retained English
cm/inch Retained cm
Initializing the Label Printer
If you experience serious malfunction of the label printer or
if operation fails completely, try performing the following
operation to initialize the printer.
Important! Initializing the label printer deletes all memory
contents. Make sure you have a back-up copy of text stored
in memory if you need it.
To initialize the label printer
1. Turn power off.
2. Holding down the PRINT, ESC, and ON keys, turn power
back on.
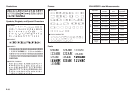
?LA
I
T
I
N
I
CSE
/
TES
• This prompt confirms whether or not you want to initialize
the label printer.
3. Press SET to initialize the label printer or ESC to abort
the reset operation.
Format Indicator
The following shows how the brackets on either side of the
format indicator change to indicate various conditions.
[■]: fixed block length (specified by user)
(■]: block text too long for fixed block length, but printing
will be performed by compressing text.
■]: Printed tape length will be longer than specified fixed
length because text will not fit within fixed tape length
even if its size is reduced 50%.
Tape Length Indicator
The following shows how the brackets on either side of the
tape length indicator change to indicate various conditions.
[5.1cm]: fixed tape length specified by user.
5.1cm]: Printing operation cannot be performed.
Printer head Roller