


E-5
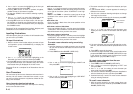
Bottom
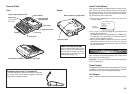
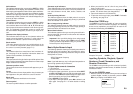
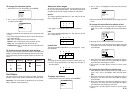
General Guide
Front
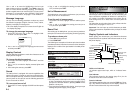
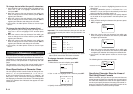
Replacing the Cover if it Comes Off
If the cover comes off, replace it as shown in the illustra-
tion nearby. Take care to avoid damaging the tabs and
hinges when installing the cover.
Power Keys
Turn power
on and off.
Handle
AC adaptor connector
3-pin jack
Tape cartridge
compartment
Cover release
Tape outlet
Print key
Letter keys
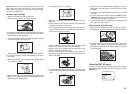
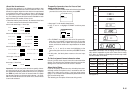
Back-up battery compartment
Insulating tape
About the insulating tape
Before using the label printer for the
first time, pull out the insulating tape
from beneath the back-up battery
compartment cover and perform the
reset operation (page E-6).
Tape cutter lever
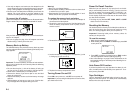
Currently
selected item
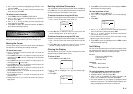
Label Printer Menus
Label printer operation is designed to be as simple as pos-
sible, thanks to on-screen menus that you can use to select
the settings you need. Each menu is described in detail in
the sections that follow in this manual, but note the follow-
ing general points when using them.
• The item that is highlighted in a menu is the one that is
currently selected.
––––
P
U
TES
––––
T
N
O
FTL
U
AFE
D
T
U
P
N
I
TSA
R
T
N
O
C
YTIS
N
E
D
DNU
O
S
E
G
A
U
G
N
AL
• Use u and i to move the highlighting up and down and
change the selected item.
• Press SET to execute the highlighted item, or ESC to exit
the displayed menu (and return to the previous menu or
screen) without selecting anything.
• When you press SET to execute a menu item, the label
printer either moves on to the next menu, or it executes
the selected function and returns to the text input screen
that you started from.
Part 2 Getting Ready
This part of the manual tells you how to replace the memory
back-up battery, load the tape cartridge, and perform other
basic setups for the label printer.
Important! Be sure to read this section before attempting
to use the label printer.
Power Supply
The label printer is powered by the AC adaptor (AD-A12140).
In addition, memory contents are protected by a CR2032
lithium battery that must be replaced periodically.
AC Adaptor
Note the following important precautions about the AC adap-
tor.
Liquid crystal display (LCD)