


E-72
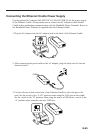
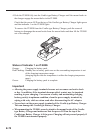
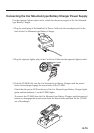
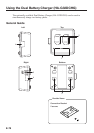
4. Push the IT-9000 fully into the Cradle-type Battery Charger until the mount hooks in
the charger engage the mount holes in the IT-9000.
Check that the power LED on the top of the Cradle-type Battery Charger lights green
and that indicator 1 on the IT-9000 lights.
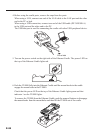
To remove the IT-9000 from the Cradle-type Battery Charger, push the removal
buttons to disengage the mount hooks from the mount holes and then lift the IT-9000
out of the charger.
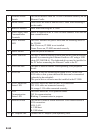
Status of Indicator 1 on IT-9000:
Orange: Charging the battery pack.
Red Flashing: Standby due to battery pack error or the surrounding temperature is out
of the charging temperature range.
(charging begins when the temperature is within the charging temperature
range)
Green: Charging the battery pack is complete.
Important!
Allowing the power supply terminals become wet can cause an electric shock
or fi re. In addition, if the terminals become soiled, contact may be impaired
resulting in poor charging. For reasons of safety and maintaining charging
battery pack(s) in optimum condition, clean the power supply terminals by
wiping with a dry cloth or cotton swab after disconnecting the AC adaptor.
Never short out the power supply terminals of the Cradle-type Battery Charger.
This can damage the Cradle-type Battery Charger.
When mounting the IT-9000, securely attach to the mount hooks of the Cradle-
type Battery Charger and make sure that the power LED on the top of the
Cradle-type Battery Charger is lit in green. Charging will not proceed properly if
the IT-9000 is not mounted properly.
•
•
•