


10-12
Catalyst 2950 and Catalyst 2955 Switch Software Configuration Guide
78-11380-10
Chapter 10 Configuring 802.1x Port-Based Authentication
Configuring 802.1x Authentication
To allow VLAN assignment (for switches running the EI), you must enable AAA authorization to
configure the switch for all network-related service requests.
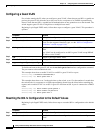
Beginning in privileged EXEC mode, follow these steps to configure 802.1x port-based authentication.
This procedure is required.
To disable AAA, use the no aaa new-model global configuration command. To disable 802.1x AAA
authentication, use the no aaa authentication dot1x {default | list-name} global configuration
command. To disable 802.1x AAA authorization, use the no aaa authorization global configuration
command. To disable 802.1x authentication on the switch, use the no dot1x system-auth-control global
configuration command.
Command Purpose
Step 1
configure terminal Enter global configuration mode.
Step 2
aaa new-model Enable AAA.
Step 3
aaa authentication dot1x {default}
method1 [method2...]
Create an 802.1x authentication method list.
To create a default list that is used when a named list is not specified in
the authentication command, use the default keyword followed by the
methods that are to be used in default situations. The default method list
is automatically applied to all interfaces.
Enter at least one of these keywords:
• group radius—Use the list of all RADIUS servers for authentication.
• none—Use no authentication. The client is automatically
authenticated by the switch without using the information supplied by
the client.
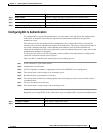
Step 4
dot1x system-auth-control Enable 802.1x authentication globally on the switch.
Step 5
aaa authorization network {default}
group radius
(Optional) Configure the switch for user RADIUS authorization for all
network-related service requests, such as VLAN assignment.
Step 6
interface interface-id Specify the interface connected to the client to be enabled for 802.1x
authentication, and enter interface configuration mode.
Step 7
dot1x port-control auto Enable 802.1x authentication on the interface.
For feature interaction information, see the “802.1x Configuration
Guidelines” section on page 10-10.
Step 8
end Return to privileged EXEC mode.
Step 9
show dot1x Verify your entries.
Check the Status column in the 802.1x Port Summary section of the
display. An enabled status means the port-control value is set either to
auto or to force-unauthorized.
Step 10
copy running-config startup-config (Optional) Save your entries in the configuration file.