


17-21
Catalyst 2950 and Catalyst 2955 Switch Software Configuration Guide
78-11380-10
Chapter 17 Configuring VLANs
Configuring VLAN Trunks
To return to the default pruning-eligible list of all VLANs, use the no switchport trunk pruning vlan
interface configuration command.
Configuring the Native VLAN for Untagged Traffic
A trunk port configured with 802.1Q tagging can receive both tagged and untagged traffic. By default,
the switch forwards untagged traffic in the native VLAN configured for the port. The native VLAN is
VLAN 1 by default.
Note The native VLAN can be assigned any VLAN ID; it is not dependent on the management VLAN.
For information about 802.1Q configuration issues, see the “802.1Q Configuration Considerations”
section on page 17-16.
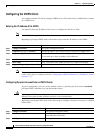
Beginning in privileged EXEC mode, follow these steps to configure the native VLAN on an 802.1Q
trunk:
To return to the default native VLAN, VLAN 1, use the no switchport trunk native vlan interface
configuration command.
If a packet has a VLAN ID that is the same as the outgoing port native VLAN ID, the packet is sent
untagged; otherwise, the switch sends the packet with a tag.
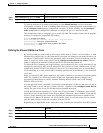
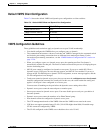
Step 4
end Return to privileged EXEC mode.
Step 5
show interfaces interface-id switchport Verify your entries in the Pruning VLANs Enabled field of the display.
Step 6
copy running-config startup-config (Optional) Save your entries in the configuration file.
Command Purpose
Command Purpose
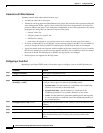
Step 1
configure terminal Enter global configuration mode.
Step 2
interface interface-id Enter interface configuration mode, and define the interface that is
configured as the 802.1Q trunk.
Step 3
switchport trunk native vlan vlan-id Configure the VLAN that is sending and receiving untagged traffic
on the trunk port.
For vlan-id, the range is 1 to 4094 when the EI is installed, and 1 to
1005 when the SI is installed.
Step 4
end Return to privileged EXEC mode.
Step 5
show interfaces interface-id switchport Verify your entries in the Trunking Native Mode VLAN field.
Step 6
copy running-config startup-config (Optional) Save your entries in the configuration file.