


30-33
Catalyst 2950 and Catalyst 2955 Switch Software Configuration Guide
78-11380-10
Chapter 30 Configuring QoS
Configuring Standard QoS
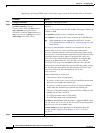
To delete an existing policy map, use the no policy-map policy-map-name global configuration
command. To delete an existing class map, use the no class class-map-name policy-map configuration
command. To remove an assigned DSCP value, use the no set ip dscp new-dscp policy-map
configuration command. To remove an existing policer, use the no police rate-bps burst-byte
[exceed-action {drop | dscp dscp-value}] policy-map configuration command. To remove the policy
map and interface association, use the no service-policy input policy-map-name interface configuration
command.
For details about configuring policy maps and security ACLs on the same interface, see Table 30-5 on
page 30-20.
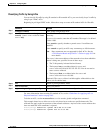
Step 5
set {ip dscp new-dscp} Classify IP traffic by setting a new value in the packet.
For ip dscp new-dscp, enter a new DSCP value to be assigned to the
classified traffic. The supported DSCP values are 0, 8, 10, 16, 18, 24,
26, 32, 34, 40, 46, 48, and 56.
Step 6
police rate-bps burst-byte [exceed-action
{drop | dscp dscp-value}]
Define a policer for the classified traffic.
You can configure up to 60 policers on ingress Gigabit-capable
Ethernet ports and up to 6 policers on ingress 10/100 Ethernet ports.
For rate-bps, specify average traffic rate in bits per second (bps). The
range is 1 Mbps to 100 Mbps for 10/100 Ethernet ports and 8 Mbps to
1000 Mbps for the Gigabit-capable Ethernet ports.
For burst-byte, specify the normal burst size in bytes. The values
supported on the 10/100 ports are 4096, 8192, 16384, 32768, and
65536. The values supported on the Gigabit-capable Ethernet ports are
4096, 8192, 16348, 32768, 65536, 131072, 262144, and 524288.
(Optional) Specify the action to take when the rates are exceeded. Use
the exceed-action drop keywords to drop the packet. Use the
exceed-action dscp dscp-value keywords to mark down the DSCP
value and send the packet.
Step 7
exit Return to policy-map configuration mode.
Step 8
exit Return to global configuration mode.
Step 9
interface interface-id Specify the interface to attach to the policy map, and enter interface
configuration mode.
Valid interfaces include physical interfaces.
Step 10
service-policy input policy-map-name Apply specified policy map to the input of a particular interface.
Only one policy map per interface per direction is supported.
Step 11
end Return to privileged EXEC mode.
Step 12
show policy-map [policy-map-name class
class-name]
Verify your entries.
Step 13
copy running-config startup-config (Optional) Save your entries in the configuration file.
Command Purpose