


C-2
Cisco Catalyst Blade Switch 3040 for FSC Hardware Installation Guide
OL-10694-01
Appendix C Configuring the Switch with the CLI-Based Setup Program
Accessing the CLI Through the Console Port
Note If the blade switches are ordered with the blade server, the blade switches are already installed, and no
unpacking is required. The unpacking procedure applies only if a blade switch is ordered separately.
Note You need to provide the Category 5 straight-through cables to connect the blade switch ports to other
Ethernet devices.
Connecting to the Console Port
Obtain and make note of this information from your network administrator before you begin the blade
switch installation:
• Switch IP address
• Subnet mask (IP netmask)
• Default gateway (router)
• Enable secret password (encrypted)
• Enable password (not encrypted)
• Telnet password
• SNMP community strings (optional)
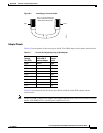
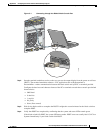
Step 1 Connect one end of the console cable to the blade switch console port. Connect the other end of the cable
to the serial port of the computer that is running the terminal emulation application. (See Figure C-1.)
You can use the mdix auto interface configuration command in the CLI to enable the automatic
medium-dependent interface crossover (auto-MDIX) feature. When the auto-MDIX feature is enabled,
the blade switch detects the required cable type for copper Ethernet connections and configures the
interfaces accordingly. Therefore, you can use either a crossover or a straight-through cable for
connections to a copper 10/100/1000 or 1000BASE-T SFP module port on the blade switch, regardless
of the type of device on the other end of the connection.
For configuration information for this feature, refer to the blade switch software configuration guide or
the blade switch command reference.