


2-15
Installation and Upgrade Guide for Cisco Unified Videoconferencing 3545 PRI Gateway and 3545 Serial Gateway Release 5.6
OL-17011-01
Chapter 2 Installing the Cisco Unified Videoconferencing 3545 Gateway
Connecting the Gateway to the Network
This is a global login name that the upload, upgrade, and Telnet utilities use to log in to the gateway
software. It can also be used to access the Administrator interface. The default user name is admin.
Step 6 In the Password field, type the software password.
The default value is null.
Note To view the software components that will upgrade, click Customize. The Customize dialog
box appears. If you do not want to upgrade a component, deselect it.
Step 7 Click Upgrade.
The upgrade process takes a few minutes. After the upload completes, the Upload Complete Message
dialog box appears.
Step 8 Click OK.
Related Topics
• Chapter 3, “Using the Cisco Software Upgrade Utility”
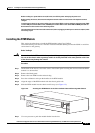
Connecting the Gateway to the Network
The Cisco Unified Videoconferencing 3545 Gateway can connect to the LAN only through the front
panel. The gateway supports a 10/100BaseT, full-duplex Ethernet interface through an RJ-45 connector.
Procedure
Step 1 Connect the supplied LAN cable from your network hub to the 10/100BaseT Ethernet port on the front
panel of the gateway. The 10/100BaseT port accepts an RJ-45 connector.
Step 2 Connect a separate ISDN or serial line to each PRI or serial port in the rear panel of the gateway. The
port accepts an RJ-45 connector.
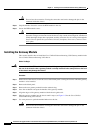
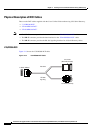
Connecting PRI Lines to the Gateway
You must connect a PRI line to at least one Cisco Unified Videoconferencing 3545 PRI Gateway port.
The gateway supports T1 and E1 PRI configurations.
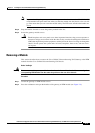
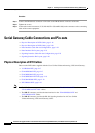
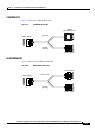
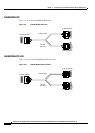
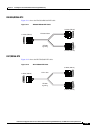
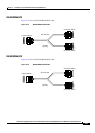
Connecting Serial Lines to the Gateway
You can connect the Cisco Unified Videoconferencing 3545 Serial Gateway to four serial lines that may
support different physical standards (V.35, RS-449 or EIA-530). The system is capable of recognizing
the type of cable connected.