


55
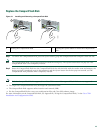
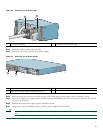
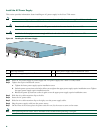
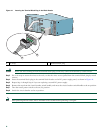
Step 6 Turn the Cisco 7201 so that the back is facing you.
Step 7 Using a Phillips screwdriver, loosen the fifteen cover screws holding the cover to the chassis.
Step 8 Lift the cover off the router.
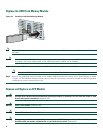
Remove and Install the DIMM
The information in this section provides instructions for replacing the DDR-SDRAM DIMM. The memory configuration you
ordered is installed in the Cisco 7201 router.
Warning
During these procedures, wear grounding wrist straps to avoid ESD damage to the card. Do not directly touch the
backplane with your hand or any metal tool, or you could shock yourself.
Statement 94
To replace or upgrade the DIMM, follow these instructions:
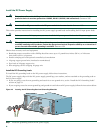
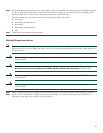
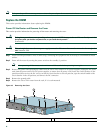
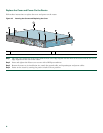
Figure 44 Removing and Replacing the DIMM
Note Use only a DIMM purchased from Cisco.
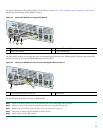
Step 1 Attach an ESD-preventative wrist strap between you and an unpainted router surface.
Step 2 Locate the DIMM on the system board.
Step 3 Press both spring latches outward to release the DIMM.
Step 4 Gently pull the DIMM free from the DIMM socket, taking care not to touch the pins that insert into the socket. Place
the DIMM in an anti-static bag.
Caution Forcing the DIMM into the socket can damage the DIMM. Use the notches on the DIMM to align the DIMM in
the DIMM socket before inserting it.
Step 5 Locate the notches and align the DIMM with the socket before inserting it.
Step 6 Gently insert the new DIMM, taking care not to damage the pins on the edge of the DIMM.
Step 7 Press down on the DIMM until the spring latches lock the DIMM in place.
For memory specifications and configurations, see Appendix A, “Specifications,” of the online Cisco 7201 Installation and
Configuration Guide.
170953