


16-13
Cisco ASA 5500 Series Configuration Guide using ASDM
Chapter 16 Completing Interface Configuration (Transparent Mode, 8.3 and Earlier)
Completing Interface Configuration in Transparent Mode (8.3 and Earlier)
e. (Optional) To renew the lease, click Renew DHCP Lease.
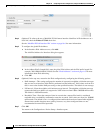
Step 7 (Optional) In the Description field, enter a description for this interface.
The description can be up to 240 characters on a single line, without carriage returns.
Note (ASA 5510 and higher, single mode) For information about the Configure Hardware Properties
button, see the “Enabling the Physical Interface and Configuring Ethernet Parameters” section
on page 12-23.
Step 8 Click OK.
Configuring a Global IPv6 Address and Other Options
To configure a global IPv6 address and other options for the management interface, perform the
following steps.
Note Configuring the global address automatically configures the link-local address, so you do not need to
configure it separately.
Restrictions
The ASA does not support IPv6 anycast addresses.
Prerequisites
• Complete the procedures in Chapter 12, “Starting Interface Configuration (ASA 5510 and Higher),”
or Chapter 13, “Starting Interface Configuration (ASA 5505).”
• In multiple context mode, complete this procedure in the context execution space. To change from
the system to a context configuration, in the Configuration > Device List pane, double-click the
context name under the active device IP address.
Detailed Steps
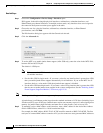
Step 1 Choose the Configuration > Device Setup > Interfaces pane.
Step 2 Choose a management interface, and click Edit.
The Edit Interface dialog box appears with the General tab selected.
Step 3 Click the IPv6 tab.