


15
Cisco uBR7200 Series Universal Broadband Router AC Power Supply Replacement Instructions
78-4848-06
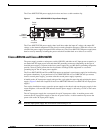
Removing and Replacing an AC-Input Power Supply
Step 2 Using a 3/16-inch flat-blade screwdriver, loosen the screws that secure the router to the front mounting
strips of the rack.
Step 3 Position at least one person in front of the rack to support the front underside of the router.
Step 4 From the rear of the rack, carefully push the front of the router out of the rack until there is enough
clearance to remove the power supply from the router.
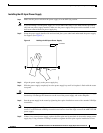
Step 5 Grasp the power supply handle and pull the AC-input power supply from the router.
This completes the procedure for removing the AC-input power supply. Proceed to the following section,
“Installing the AC-Input Power Supply.”
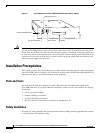
Installing the AC-Input Power Supply
Step 1 Make sure the power switch on the power supply is in the OFF (O) position.
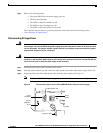
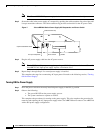
Step 2 Grasp the power supply handle with one hand and place your other hand underneath the power supply
for support. (See Figure 5.)
Note If you are adding a second power supply to a Cisco uBR7246VXR or Cisco uBR7246 that previously
only had one power supply installed, make sure the power supply filler plate and its attached air dam
have been removed from the power supply bay.
Step 3 Align the power supply to the power supply bay.
Step 4 Slide the power supply completely in to the power supply bay until its faceplate is flush with the router
rear panel.
Caution When inserting a power supply into the router, do not use unnecessary force; slamming the power supply
into the bay can damage the connectors on the rear of the supply and on the midplane.
Step 5 Seat the power supply in the router by tightening its captive installation screws with a number 2 Phillips
screwdriver. Use the flat head or Phillips screw driver to fasten or losen the single screw on the
uBR7225VXR power supply.
Note The power supply is not fully seated in the router midplane until you tighten the captive installation
screws.
Step 6 If you pushed the router forward in the rack, slowly guide the router back into the rack.
Step 7 Use a 3/16-inch flat-blade screwdriver to tighten the screws that secure the router to the front mounting
strips of the rack.
This completes the procedures for installing the AC-input power supply in the router. Proceed to the
following section, “Reconnecting AC-Input Power”.
Reconnecting AC-Input Power
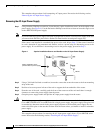
Step 1 At the rear of the router, check that the power switch on the power supply is in the OFF (O) position.
Step 2 Push the cable-retention clip to the left, away from the AC receptacle, and plug in the power cable.