


10
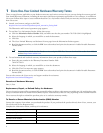
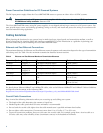
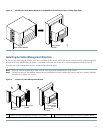
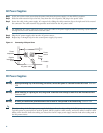
Figure 5 Installing the Rack-Mount Brackets so the Front of the Chassis Is Flush with the Rack
Note You cannot use the cable management bracket in this configuration.
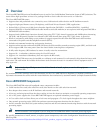
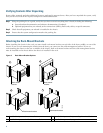
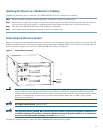
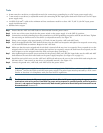
Figure 6 Installing the Rack-Mount Brackets so the Front of the Chassis Protrudes Out of the Rack
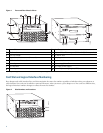
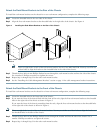
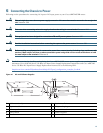
Attach the Rack-Mount Brackets to the Middle of the Chassis
To install the rack-mount brackets for an open or relay-type rack-mount configurations, complete the following steps:
Step 1 Locate the threaded holes in the middle sides of the chassis.
Step 2 Align the first rack-mount bracket to the threaded holes in the right side of the chassis, as shown in Figure 7. Use either
set of four holes to align the bracket to the threaded holes in the sides of the chassis.
Step 3 Thread the four M4 x 6-mm Phillips flathead screws through the rack-mount bracket and into the side of the chassis.
Use a number 2 Phillips screwdriver to tighten the screws.
Step 4 Repeat Step 1 through Step 3 to attach the other rack-mount bracket.
Step 5 See the “Installing the Cable-Management Brackets” section on page 11 for cable management bracket instructions.
103557
Rack-mount bracket
Rack-mount bracket
103558
Rack-mount bracket
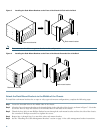
Rack-mount bracket