


Battery Maintenance 5-11
4.
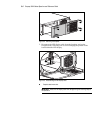
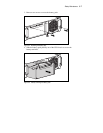
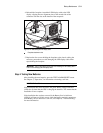
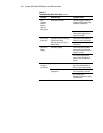
Reinstall the faceplate. Attach the LED display cable to the LED
display, aligning the two alignment pins on the smooth side of the
connector with the slots at the bottom of the receptacle.
1
Figure 5-10. Reattaching the LED display cable
Faceplate attachment slots
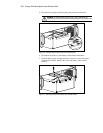
5.
Replace the four screws holding the faceplate to the chassis, taking the
necessary precautions to avoid damaging the LED display cable when
repositioning the faceplate.
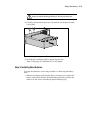
IMPORTANT: Take the appropriate precautions when installing the new battery pack in
order to avoid damaging the LED display cable.
Step 4: Testing New Batteries
After installing the new batteries, press the TEST/ALARM RESET button.
See Chapter 3, “Operation,” for information on running a self-test.
IMPORTANT: The UPS will not execute a self-test until the batteries are 90% charged.
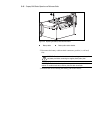
If the installation has been successful, the green Battery Charge indicators
(LEDs 6 to 8) show that the UPS is charging the batteries. This means that the
installation is now complete.
If the installation has not been successful, the Battery Service indicator
(LED 10) will turn red. If this occurs, check the battery terminal connections.
If the Battery Service indicator is still red, see Chapter 6, “Troubleshooting,”
for more information.