


Compaq Presario Series Maintenance and Service Guide
United States December 9, 2002
Presario 305 Model
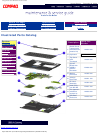
Before You Begin Specifications Parts Catalog
Removal Sequence Troubleshooting Battery Operations
Product Description Pin Assignments
Index
Solving Minor Problems
Some minor problems and possible solutions are outlined in the following tables. If the problem appears related to a
software application, check the documentation provided with the software.
Audio Battery pack Battery gauge CD/DVD drive
Diskette/diskette
drive
Display Hard drive
Hardware
installation
Keyboard Memory
PC card Power Printer
Touchpad/pointing
device
Infrared
USB Modem
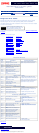
Audio Problems
Problem Probable Cause Solution(s)
Computer does not beep after the
Power-On Self-Test (POST).
System beeps have been turned down. Use the Fn+F5 hotkeys to turn
up the system volume.
Internal speaker does not produce
sound when an external audio
source is connected to the stereo
line-jack.
Volume may be turned off or set too low. 1. Adjust the overall volume by
pressing Fn+F5 hotkeys.
2. Adjusting the sliding mixer
controls by double-clicking the
speaker icon on the Windows
taskbar.
Line input may not be connected properly. Check line input connection.
Headphones or speakers are connected to the
stereo speaker/headphone jack, which disables the
internal speakers.
Disconnect the headphones or
speakers to enable the internal
speakers.
Volume may be muted. Uncheck the mute box in the
volume properties.
External microphone does not work. Using the wrong type of microphone or microphone
plug for the computer.
Check to see if you are using a
monophonic electret condenser
microphone with a 3.5 mm
plug.
The microphone may not be connected properly. Ensure that the microphone
plug is properly connected to
the mono microphone jack.
Sound source not selected. Ensure that the microphone is
selected as the recording
source in Control Panel,
Multimedia and the recording
level is adjusted.
Audio settings are not set correctly. Check the audio settings for
game programs.
Volume control on the computer is turned down. Adjust the computer volume
with the Fn+F5 hotkeys.
No sound from headphones Volume or mixing controls set incorrectly. 1. Adjust the overall volume
with the Fn+F5 hotkeys.
2. Use the mixing features
available by double-clicking the
speaker icon on the Windows
taskbar.
Sound source not selected. Verify that the sound source is
selected in Control Panel,
Multimedia.
The headphones are connected to the wrong jack.
Check the connection.
Volume too low or too loud. Volume or mixing controls set incorrectly.
1. Adjust the overall volume
with the Fn+F5 hotkeys.
2. Check the mixing features
available by double-clicking the
speaker icon on the Windows
taskbar.
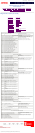
Battery Pack and Battery Gauge Problems (see also Power Problems)
Problem Probable Cause Solution(s)
Computer won't turn on
when battery pack is
inserted and power cord
is unplugged.
Battery pack is discharged. 1. Connect the computer to an external power
source and charge the battery pack.
2. Replace the battery pack with a fully charged
battery pack.
Battery connectors may be bent
or broken.
Check the battery connectors on the system
board to verify they are evenly spaced and that
they are not bent or broken.
Computer is beeping
and battery power light
is blinking.
Battery pack charge is low. Immediately save any open file(s). Then either:
● Connect the computer to an external
power source to charge the battery pack.
● Replace the battery pack with another
fully charged battery.
● Turn off the computer or initiate
Hibernation until another power source or
fully charged battery pack is available.
Computer battery
charge light blinks to
indicate low battery
condition, but computer
does not beep.
Volume is turned down too low. Turn up the volume by using the Fn+F5
hotkeys.
Battery charge does not
last very long.
Battery is exposed to high
temperatures.
Put the computer in a cooler place and
recharge the battery pack.
Battery pack was exposed to
extremely cold temperatures.
Put the computer in a warmer place and
recharge the battery pack.
Keep the battery pack within the recommended
temperature ranges:
Operating: 50° F to 104° F (10° C to 40° C)
Storage: 32° F to 86° F (0° C to 30° C )
Battery conservation is disabled or
set to drain.
Reset the battery conservation level.
An external device is draining the
battery.
Turn off or remove any external device or PC
Cards when not in use.
Battery gauge may be inaccurate
and require recalibration.
Recalibrate the gauge.
Date and time must be
set every time computer
is turned on.
Real Time Clock (RTC) battery is
has reached the end of its useful
life.
Restore power, then turn on the computer with
the power switch.
Contact your Compaq authorized service
provider to replace the RTC battery.
Battery pack is warm
after charging.
Normal warming occurs during
charging.
No action is required.
Battery pack will not
charge.
Battery pack was exposed to
temperature extremes.
Allow time for the battery pack to return to room
temperature.
Keep the battery pack within the recommended
temperature ranges:
Operating: 50° F to 104° F (10° C to 40° C)
Storage: 32° F to 86° F (0° C to 30° C )
Recharge the battery pack.
Battery pack is already charged. No action required.
Battery pack has exceeded its
useful life cycle.
Use a different battery pack.
Computer shut down
and memory was lost
when replacing the
battery pack.
Hibernation was not initiated
before removing the battery pack.
Work is lost.
Battery gauge seems
inaccurate.
The battery pack may need
calibration.
Recalibrate the battery.
The battery pack has reached the
end of its useful life.
Replace the battery pack.
CD/DVD Drive Problems
Problem Probable Cause Solution(s)
Drive cannot read a disc. Disc is not properly seated in the drive. Open loading tray, insert the disc, then
close the tray.
Disc loaded in the loading tray upside
down.
Open the loading tray, turn over the
disc (label facing up), then close the
tray.
Disc has a scratch on its surface. Insert a different disc.
CD-ROM drive or DVD-
ROM drive is not detected
by the computer.
Drive is not properly connected. If you are running a version of
Windows that was pre-installed by
Compaq, remove the drive from the
MultiBay and reinsert it.
If you are running a version of
Windows that was not pre-installed by
Compaq, turn the computer off. Then
remove the drive from the MultiBay
and reinsert it.
Diskette and Diskette Drive Problems
Problem Probable Cause Solution(s)
Drive cannot
write to a
diskette.
Diskette is write-protected. Disable the write-protect feature or
use a diskette that is not write-
protected.
Writing to the wrong drive. Check the drive letter in the path
statement.
Not enough space is left
on the diskette.
Save the information to another
diskette.
Drive error has occurred. Run Computer Checkup from the
Compaq Diagnostics diskette.
Diskette is not formatted. Format the diskette:
If you are using Windows 98:
1. From the Windows desktop,
select My Computer.
2. Select 3.5-in Floppy (A).
3. Select File, then Format.
4. Fill in the appropriate
information, then select Start.
Drive is disabled. Enable the proper drive through
Device Manager.
Disable diskette write ability is
turned on.
Run Computer Setup. Select the
Storage icon. Make sure Disable
diskette write ability is not checked.
Diskette drive
cannot read a
diskette.
Wrong type of diskette is
being used.
Use the type of diskette required by
the drive.
Diskette has a bad sector. Copy files to hard drive or another
diskette. Reformat bad diskette.
Drive error has occurred. Run Computer Checkup from the
Compaq Diagnostics diskette.
Diskette is not formatted. Format the diskette:
If you are using Windows 98:
1. From the Windows desktop,
select My Computer.
2. Select 3.5-in Floppy (A).
3. Select File, then Format.
4. Fill in the appropriate
information, then select Start.
System cannot
start up from
diskette or
SuperDisk LS-
120 drive.
A bootable diskette is not in
the drive.
Verify that a diskette with the
necessary system files is in the
drive.
Diskette bootability is
disabled in Computer Setup.
Enable diskette bootability in
Computer Setup, Security menu.
privacy and legal statement
http://h18000.www1.hp.com/athome/support/msgs/305/tblnodg2.html [12/9/2002 2:21:03 PM]