


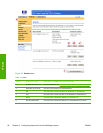

4 If applicable, type additional information that you would like to appear at the beginning of the e-
mail alert message in the Your Notes (optional) text field.
5 Click OK.
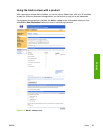
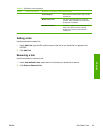
To delete destinations and destination lists
If you have multiple destinations configured, you can delete a destination or destination list by
clicking the Delete button next to the destination or destination list that you want to delete. Click OK
to confirm the deletion.
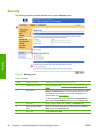
Sending e-mail commands to the product
Another method for receiving information pages is by requesting them from the product. When
outgoing and incoming mail are configured, the product can attach information pages, such as the
Supplies Status page or the Configuration page, to e-mail messages. You can use this feature to
solve a problem or check the status of supplies.
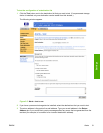
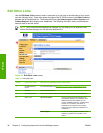
To request information pages by using an e-mail message
When composing a message to the product, you must format the To, From, and Subject fields
correctly in your e-mail program.
1 Make outgoing and incoming e-mail functions available by following the instructions that are
listed in this chapter. (For more information, see
E-mail Server )
2 From your e-mail program, compose a message to the product by completing the following steps:
a In the To field, type the product's e-mail address. The user name combined with the
product's domain name (which is specified in the outgoing mail configuration) is the e-mail
address for the product. For example, if the POP3 mailbox account user name is "product"
and the POP3 server is "hp.com", the product's e-mail address is "product@hp.com".
b Your e-mail program should automatically complete the From field with your return e-mail
address.
c In the Subject field, type the appropriate text for the format and page that you would like to
attach. You can request a Configuration page, a Supplies Status page, or an AutoSend
page. For example, if you would like to attach the Configuration page in .HTML file format,
type this.configpage?configpage=email&format=html.
32 Chapter 3 Configuring the product from the Settings screens ENWW
Settings