


System Software & Restoration
3-4
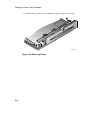
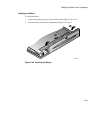
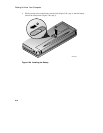
6. The program will prompt you to remove your CD-ROM Drive and insert the Floppy
Drive. The CD-ROM and Floppy Drives are hot swappable; there is no need to power
down the notebook before swapping drives. Replace the drive now. There will be a
short delay as system the recognizes the new drive. When touch pad/mouse
functionality returns, insert the first formatted diskette and click [OK].
7. When prompted to insert a second formatted diskette, remove the diskette 1 and label it
Armada Boot Diskette 1. Then insert the second diskette and click [OK].
8. When complete remove the second diskette and label it Armada Boot Diskette 2. Write
protect both diskettes.
AMI Diagnostics
Both Windows 95 and Windows NT users receive AMI Diagnostics, a DOS-based
diagnostic utility, found on the Compaq Software CD. AMI Diagnostics is designed to help
isolate hardware failures and identify important system configuration information prior to
requesting on-site service, or returning your computer to a service center for repair. In
addition to being able to run AMI Diagnostics from the Compaq Software CD, the AMI
Diagnostics utility can as be run from the bootable diskette set created via the Make Boot
Diskettes utility.
Using AMI Diagnostics on CD
In the event of a hardware failure, your system can be booted from the Compaq Software
CD. The AMI Diagnostics can then be used to examine the computer’s current
configuration, locate faulty components, and troubleshoot problems. If your system fails to
boot, proceed as follows:
1. Insert the Compaq Software CD into the CD-ROM Drive and power on the notebook.
Enter the System Setup Program by pressing [fn]+[F3] key combination when the
Compaq logo appears.
2. Ensure that the Power Savings option on the Power menu is set to Disabled. Also ensure
that ATAPI CD-ROM is the first entry in the boot priority list found on the Boot menu.
Then select the Exit Saving Changes option found on the Exit menu. The notebook will
automatically reboot. Refer to Chapter 4, “Configuring Your Notebook” for more
information on making configuration changes in System Setup.
3. When the Compaq Armada Boot CD screen appears, press [Y] to proceed. The Armada
Boot CD menu will appear.
[1] FDISK to partition your Hard Drive
[2] Format your Hard Drive
[3] Run AMI System Diagnostics
[4] Quit