


6 Select any additional buttons you want to display on the home screen, and then touch Continue.
7 If Fax is enabled, type in your Fax Station name, and then touch Enter. For more information on fax station name
and number, see your system support person; or touch Back to go back and deselect Fax.
8 If Fax is enabled, enter the Fax station (phone) number for this printer, and then touch Continue.
9 If E-mail is enabled, type in the Primary SMTP (mail server) Gateway address, and then touch Enter. For more
information on enabling e-mail, see your system support person; or touch Back to go back and deselect
E-mail.
10 If prompted, set the date and time, and then touch Continue.
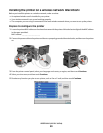
Enter the printer information
1 Access the AirPort options.
In Mac OS X version 10.5 or later
a From the Apple menu, choose System Preferences.
b Click Network.
c Click AirPort.
In Mac OS X version 10.4 and earlier
a From the Finder desktop, choose Go >Applications.
b From the Applications folder, double-click Internet Connect.
c From the toolbar, click AirPort.
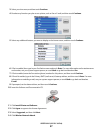
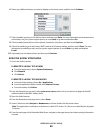
2 From the Network pop-up menu, select print server xxxxxx, where the x’s are the last six digits of the MAC
address located on the MAC address sheet.
3 Open the Safari browser.
4 From the Bookmarks drop-down menu, select Show.
5 Under Collections, select Bonjour or Rendezvous, and then double-click the printer name.
Note: The application is referred to as Rendezvous in Mac OS X version 10.3, but is now called Bonjour by Apple
Computer.
6 From the main page of the Embedded Web Server, navigate to the page where the wireless settings information
is stored.
Additional printer setup
60